When used effectively, microphone balance can be useful when it comes to adding depth and focus to your compositions. In this article we'll be looking into how you can combine some of these microphones to not only enhance your compositions, but to give you a better understanding of the Mic Mixer in general. The final intention being that you can then confidently adjust the mixer to your own personal preference.
By default, the SSO has 4 microphone positions: Close, Decca Tree, Ambient and Outrigger.
Microphone Information
CLOSE
Also known as "Spots", this signal will give you closest sound to the instruments. You will hear significantly less of the hall, with much more detail, focus and 'bite'.
TREE
The default microphone in most Spitfire libraries. The Decca Tree is situated high above the conductors head, giving a strong representation of the hall and room, whilst maintaining instrument focus and great imaging. This should almost always be the start point of any microphone mix.
AMBIENT
Placed at the back of the room, these microphones will give a great amount of the hall, perfect for adding ambience and depth to your mix in combination with other microphones. Best used in combination with the Decca Tree.
OUTRIGGERS
Sometimes referred to as "Boosters", Outriggers have slightly more distance in comparison to the Decca Tree signal, but with significantly more natural width. These are particularly good on Strings and Brass due to their position on the sound stage.
LEADER
Unique only to Symphonic Strings, this microphone is placed close to the leader of the section, capturing a direct signal with minimal ambience. Think of this as the leader's spot mic. Great for bringing out a little more expression.
CLOSE RIBBON (LEGACY)
Almost identical to the Close in placement, but instead using a ribbon microphone - producing a much warmer and well rounded tone. This is not available in the current version of SSO.
STEREO PAIR (LEGACY)
Somewhat similar to the Decca Tree in placement, but with less direct focus. Compare these to the Decca and you'll find the imaging is quite different! This is not available in the current version of SSO.
GALLERY (LEGACY)
Recorded way up in the galleries, these microphones give the absolute greatest amount of room possible, a huge representation of the AIR Lyndhurst hall! This is not available in the current version of SSO.
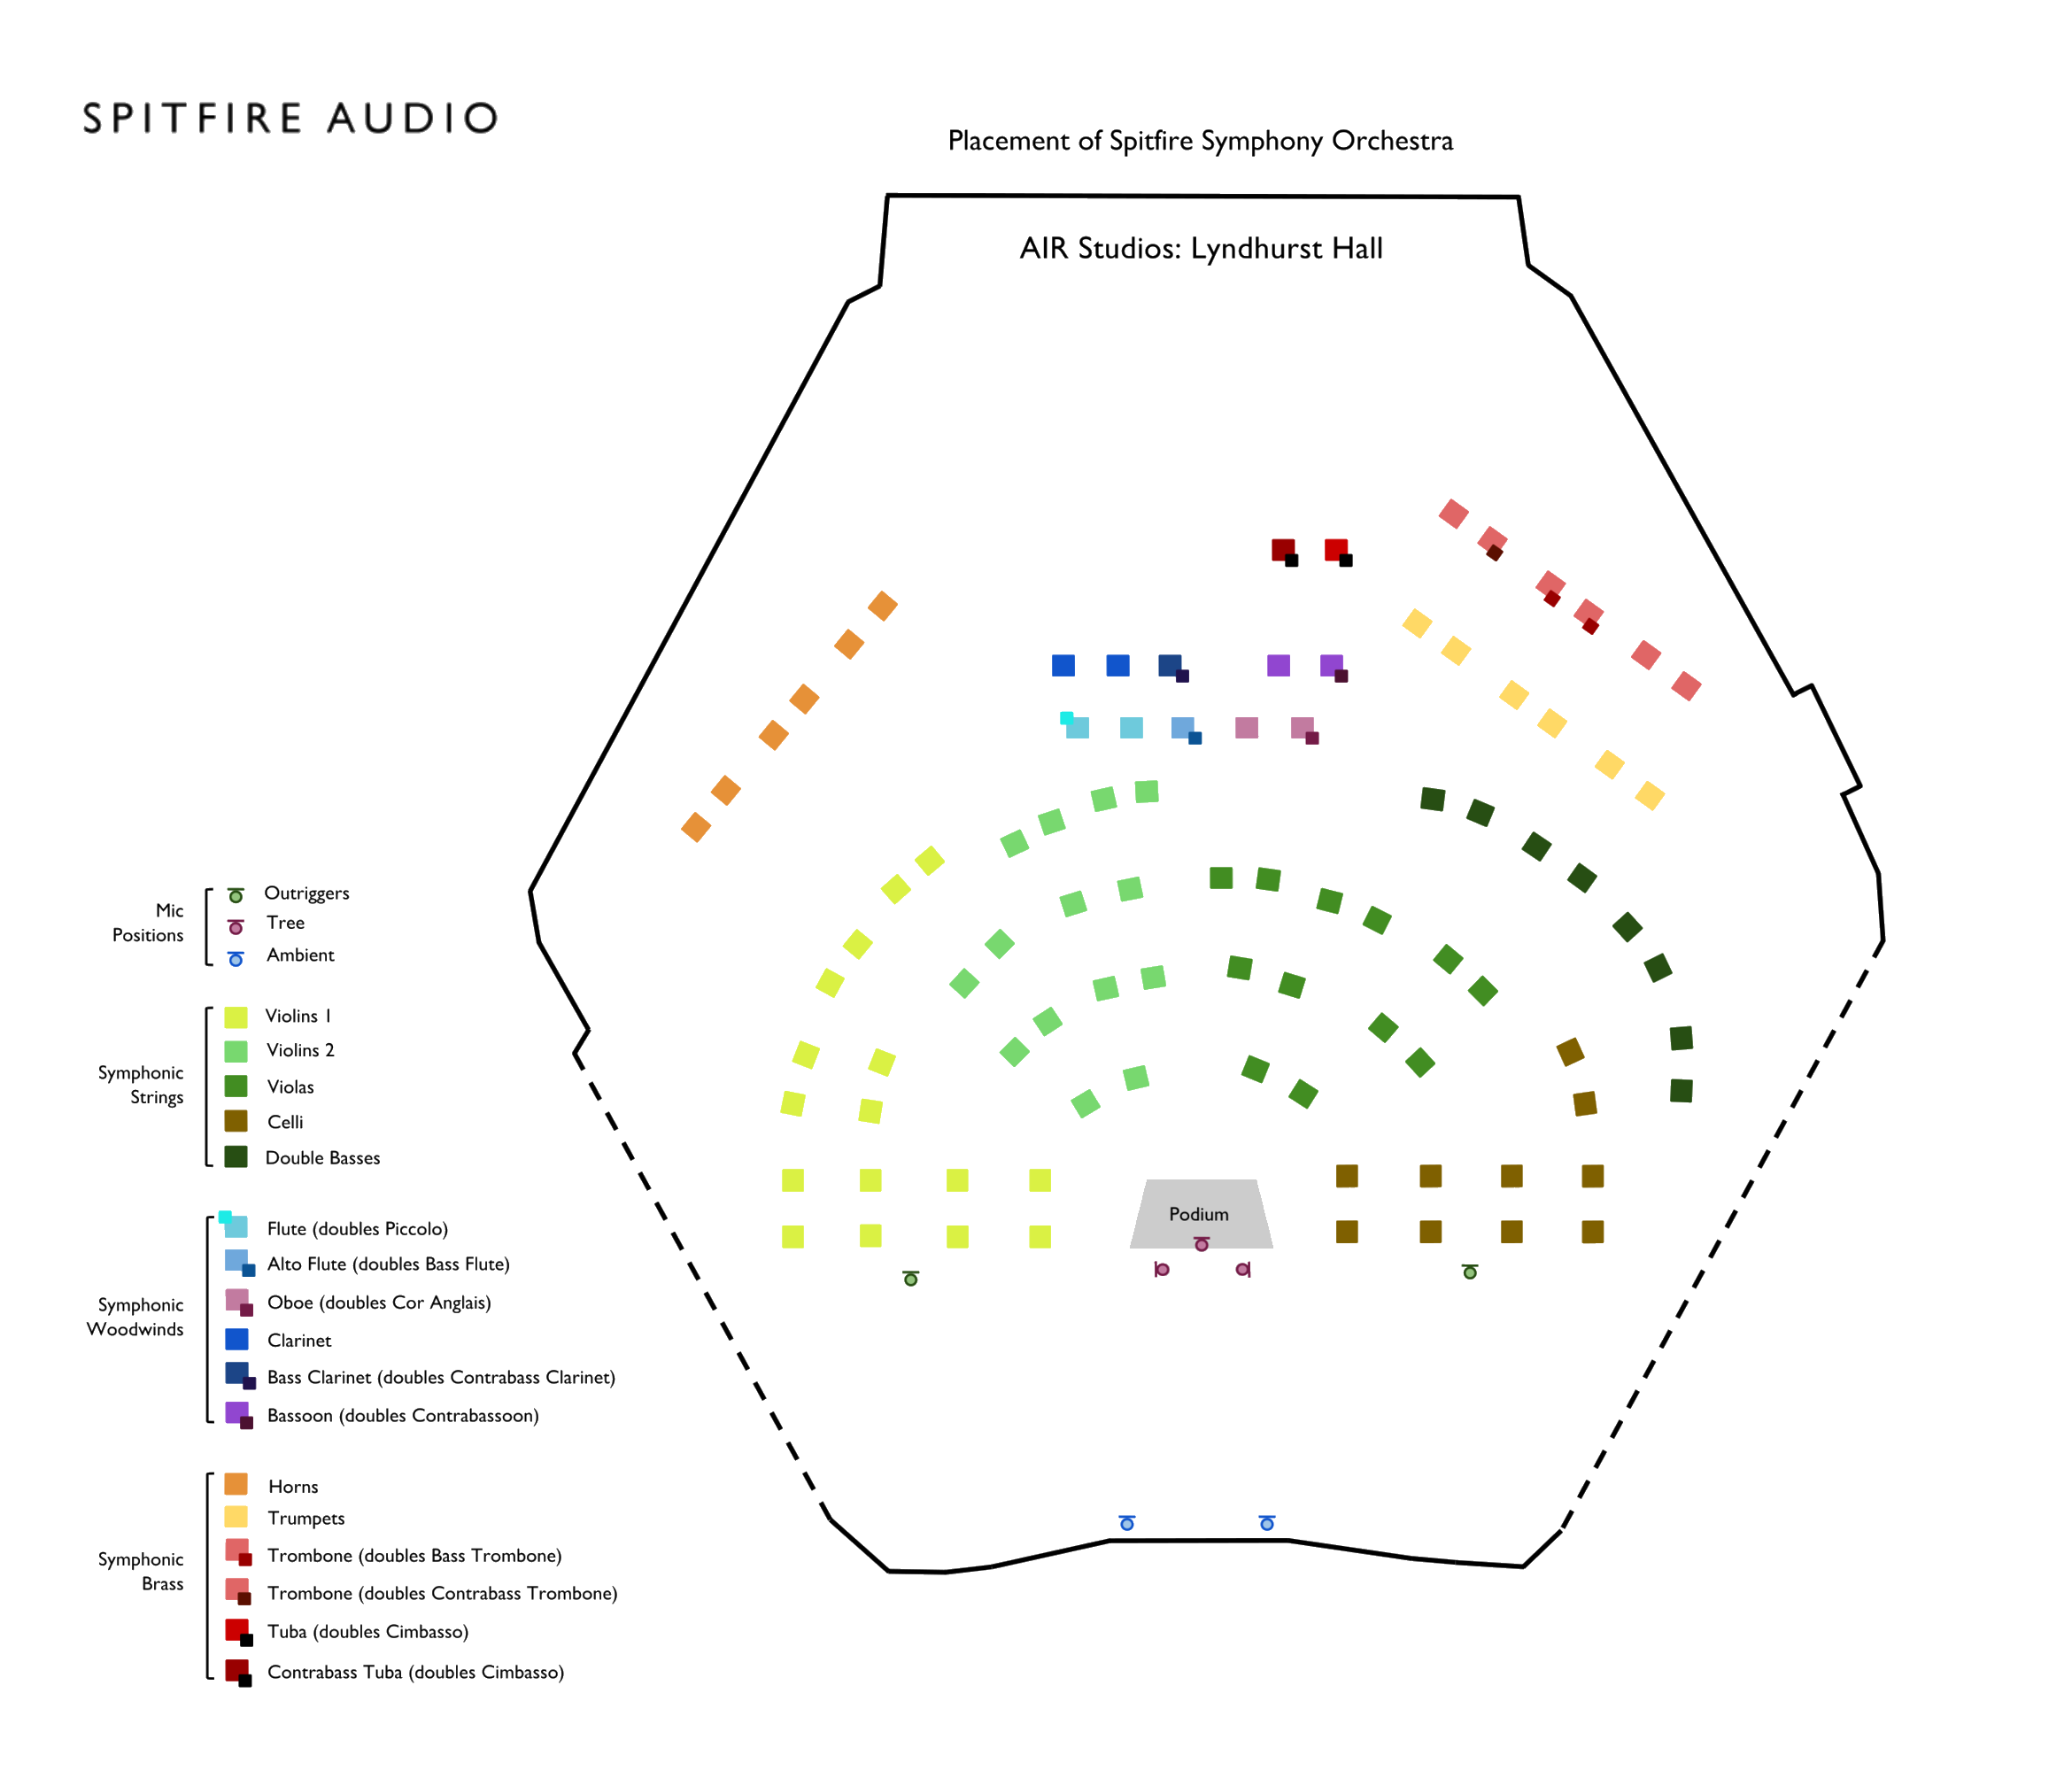
The AIR Lyndhurst Hall & Placement
 Getting Started With Combinations
An important note when combining and balancing microphones is to imagine where the "focus" is in your composition. Do you have a solo Flute line that needs some clarity? Do you want your percussion to sit as far back in the mix as possible? Maybe it is both! A good starting point is to listen to a composition that is similar in style to your own, and really try to 'hear' where the instruments are sitting in the mix. Whilst microphones often cannot achieve all of this alone, they can certainly give you a good starting point! This doesn't mean that if you want your Percussion to sound far away that you should just use the Ambient mics - by nature they're recorded in situ, and already have that natural depth. This applies more to perhaps using less Close mic to help things feel more distant.
Try to use one 'main' microphone, and to dial in others as secondary. Some examples of what are considered main microphone contenders are: Decca Tree, Stereo Pair, and Outriggers. Secondary microphones fall under Close, Ambient, Outriggers (for natural width), Gallery, and Leaders. As a starting point, use one main microphone and dial in others at around -6dB. From there adjust to your taste. One great thing to do is to mock up existing pieces, this can help in training your ears to 'hear' the balance, and can also help in setting up your template for use in the future.
One more thing to note: this truly does come down to personal preference. Some people much prefer a closer mix, whereas some prefer a distant mix. The real goal is to trust what sounds good to you. There are no rules here, experiment and have fun!
Technical Tips & Tricks
CC DATA
By default, each microphone is assigned to a CC number, meaning that you can control these through faders or on your MIDI Controller. Using automation on microphones can be very useful, and many of the great engineers (such as Shawn Murphy) will often 'ride' certain microphone signals where needed. The CC values for these microphones are as follows:
Close / CC22
Tree / CC23
Ambient / CC24
Outrigger / CC25
STEREO WIDTH & PAN
Another handy tool built into the interface is that you can choose to pan and enhance the stereo image of the microphones. Above the mic mixer, selecting this icon on your interface will open up stereo width and pan, select the microphone you'd like to change and then edit away! This is extremely useful on the Close mics.
MIC SPECIFIC OUTPUTS
Another helpful tool on the interface is the ability to assign individual microphones to different outputs within Kontakt, which can come in very useful if you'd like some extra control over signals when mixing. You can access this by simply right-clicking the respective letter beneath the faders.
MIX BY ARTICULATION
When an articulation is selected, you can 'save' a specific microphone mix to it by selecting this icon on the interface. Handy when it comes to things such as dialing more close signal into your short articulations for more bite.
KEY MODIFIERS
You can use certain keys on your computer whilst dragging the sliders to change the way they behave.
Shift: More precise control whilst dragging.
ALT: Prevents the microphone from loading/purging.
Ctrl/Cmd: Reset to 100% levels upon release.
FAQ:
Q: Should I still use Reverb with all these mics loaded?
A: Whilst in some of the more 'distant' mixes you may not feel you need to, you absolutely can. A little extra 'glue' reverb can go a long way!
Q: Which reverbs would you recommend for use with the Spitfire Symphonic Orchestra?
A: Our very own AIR Studios Reverb can be used to blend other libraries into the hall with SSO, as well as add depth to SSO itself. Jake Jackson often favours the "Worcester Hall" preset in Altiverb. Another great choice is "Seventh Heaven Professional" from LiquidSonics. We do have a couple of handy YouTube videos on the subject, which can be found here and here.
Q: I'm limited when it comes to CPU power and/or RAM, is there a workaround?
A: There are multiple ways that you can approach this, perhaps one of the more popular would be to use a 'freeze' and 'unload' function in your DAW once you've activated the microphones. Another option is to export the stems separately for each microphone, and then do the mixing/balancing in another session - as would be done with a real orchestral mix!
Q: Where can I hear some more examples of the SSO balanced with the microphone mixer?
A: Andy Blaney is well known for using only microphone mixes in his Spitfire demos. Look out for his demos on the product pages, as well as on the official SoundCloud page here. As well as this, you can check out Spitfire Audio Developer Luke Olney's SSO specific mockups here.