Articulation sets are a feature in Logic which allow you to program articulation changes easily. With a correctly configured articulation set you can select a note (or notes) in the Piano Roll editor and simply choose the desired articulation as pictured below:
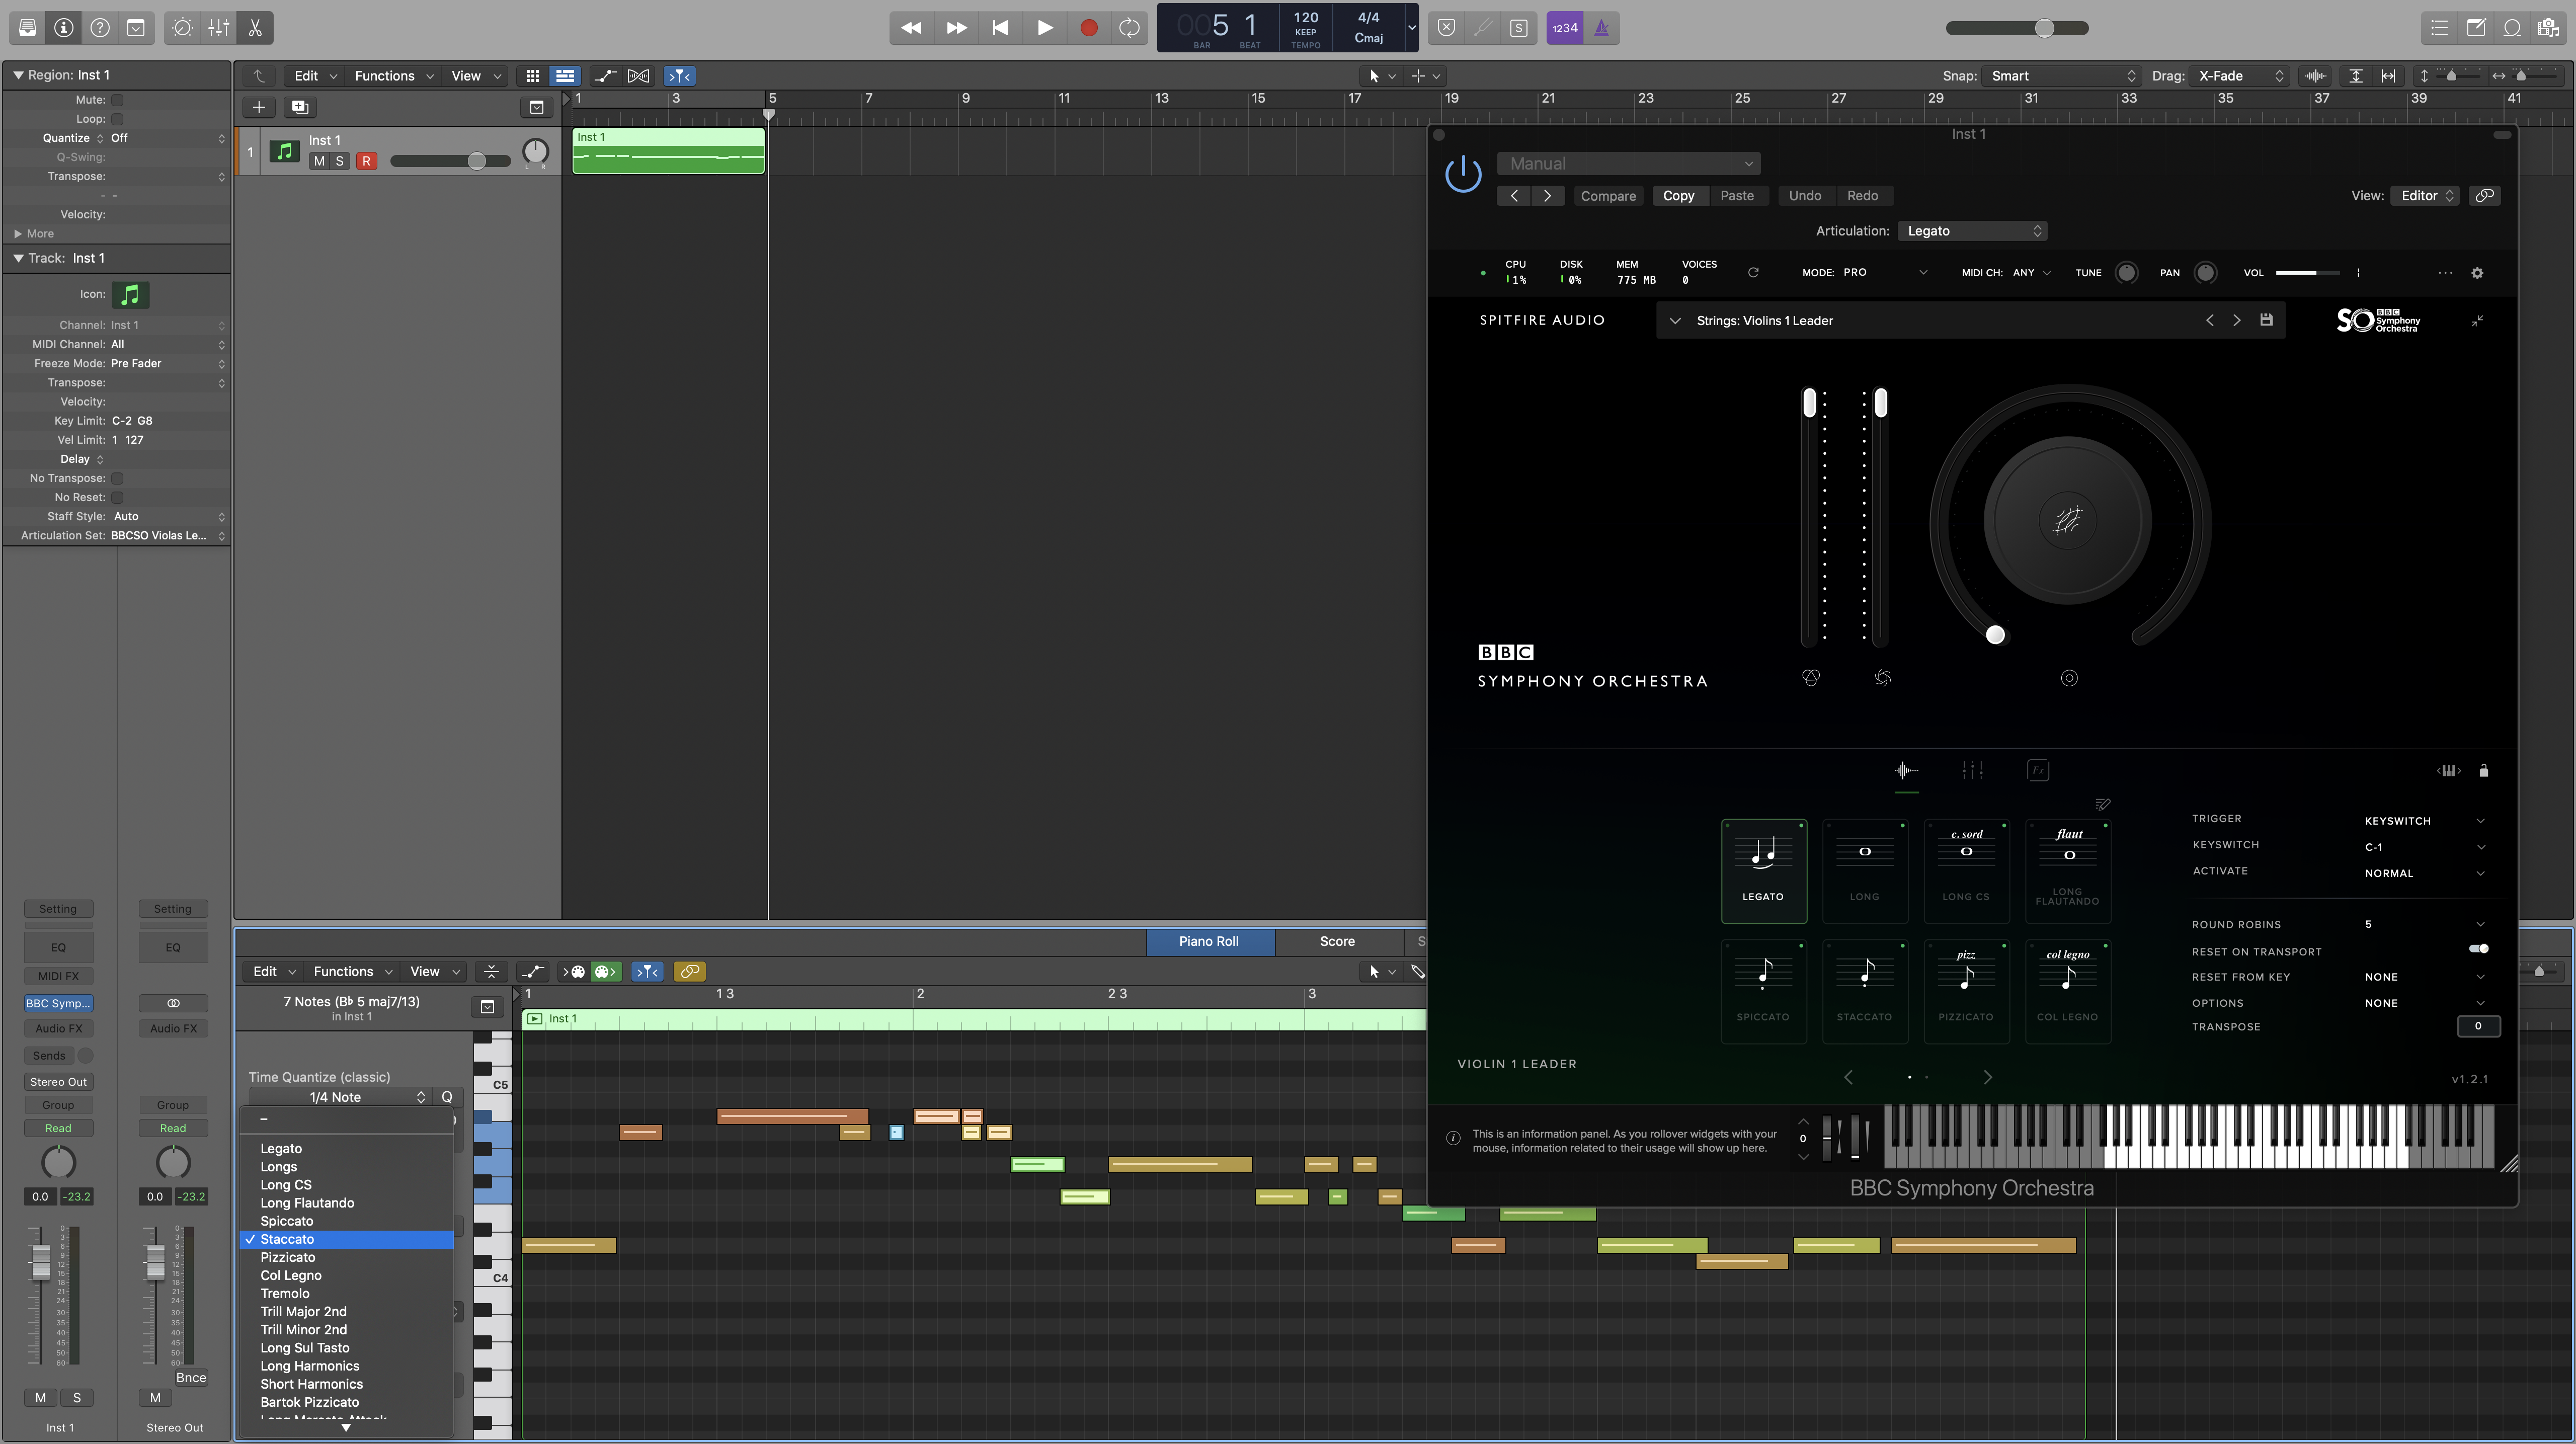
There are two recommended methods for setting up Articulation Sets. The first is to select a Keyswitch via a Note. By default, all of our libraries start from a keyswitch note value C-2 in an ascending order. This is the method you should use when using our dedicated plugin libraries, and if using a instance of Kontakt that does not use Kontakt Multi's:
If you are using multiple instances of a library within a single instance of Kontakt (known as a Multi), you will notice the Keyswitches will clash as all libraries begin from C-2. To avoid this, you should use UACC Keyswitching as described below:
Here are text instructions for both examples:
Open a New Articulation Set
First, you will need to create a new Articulation Set from the Info Menu.

The Articulation Set Menu
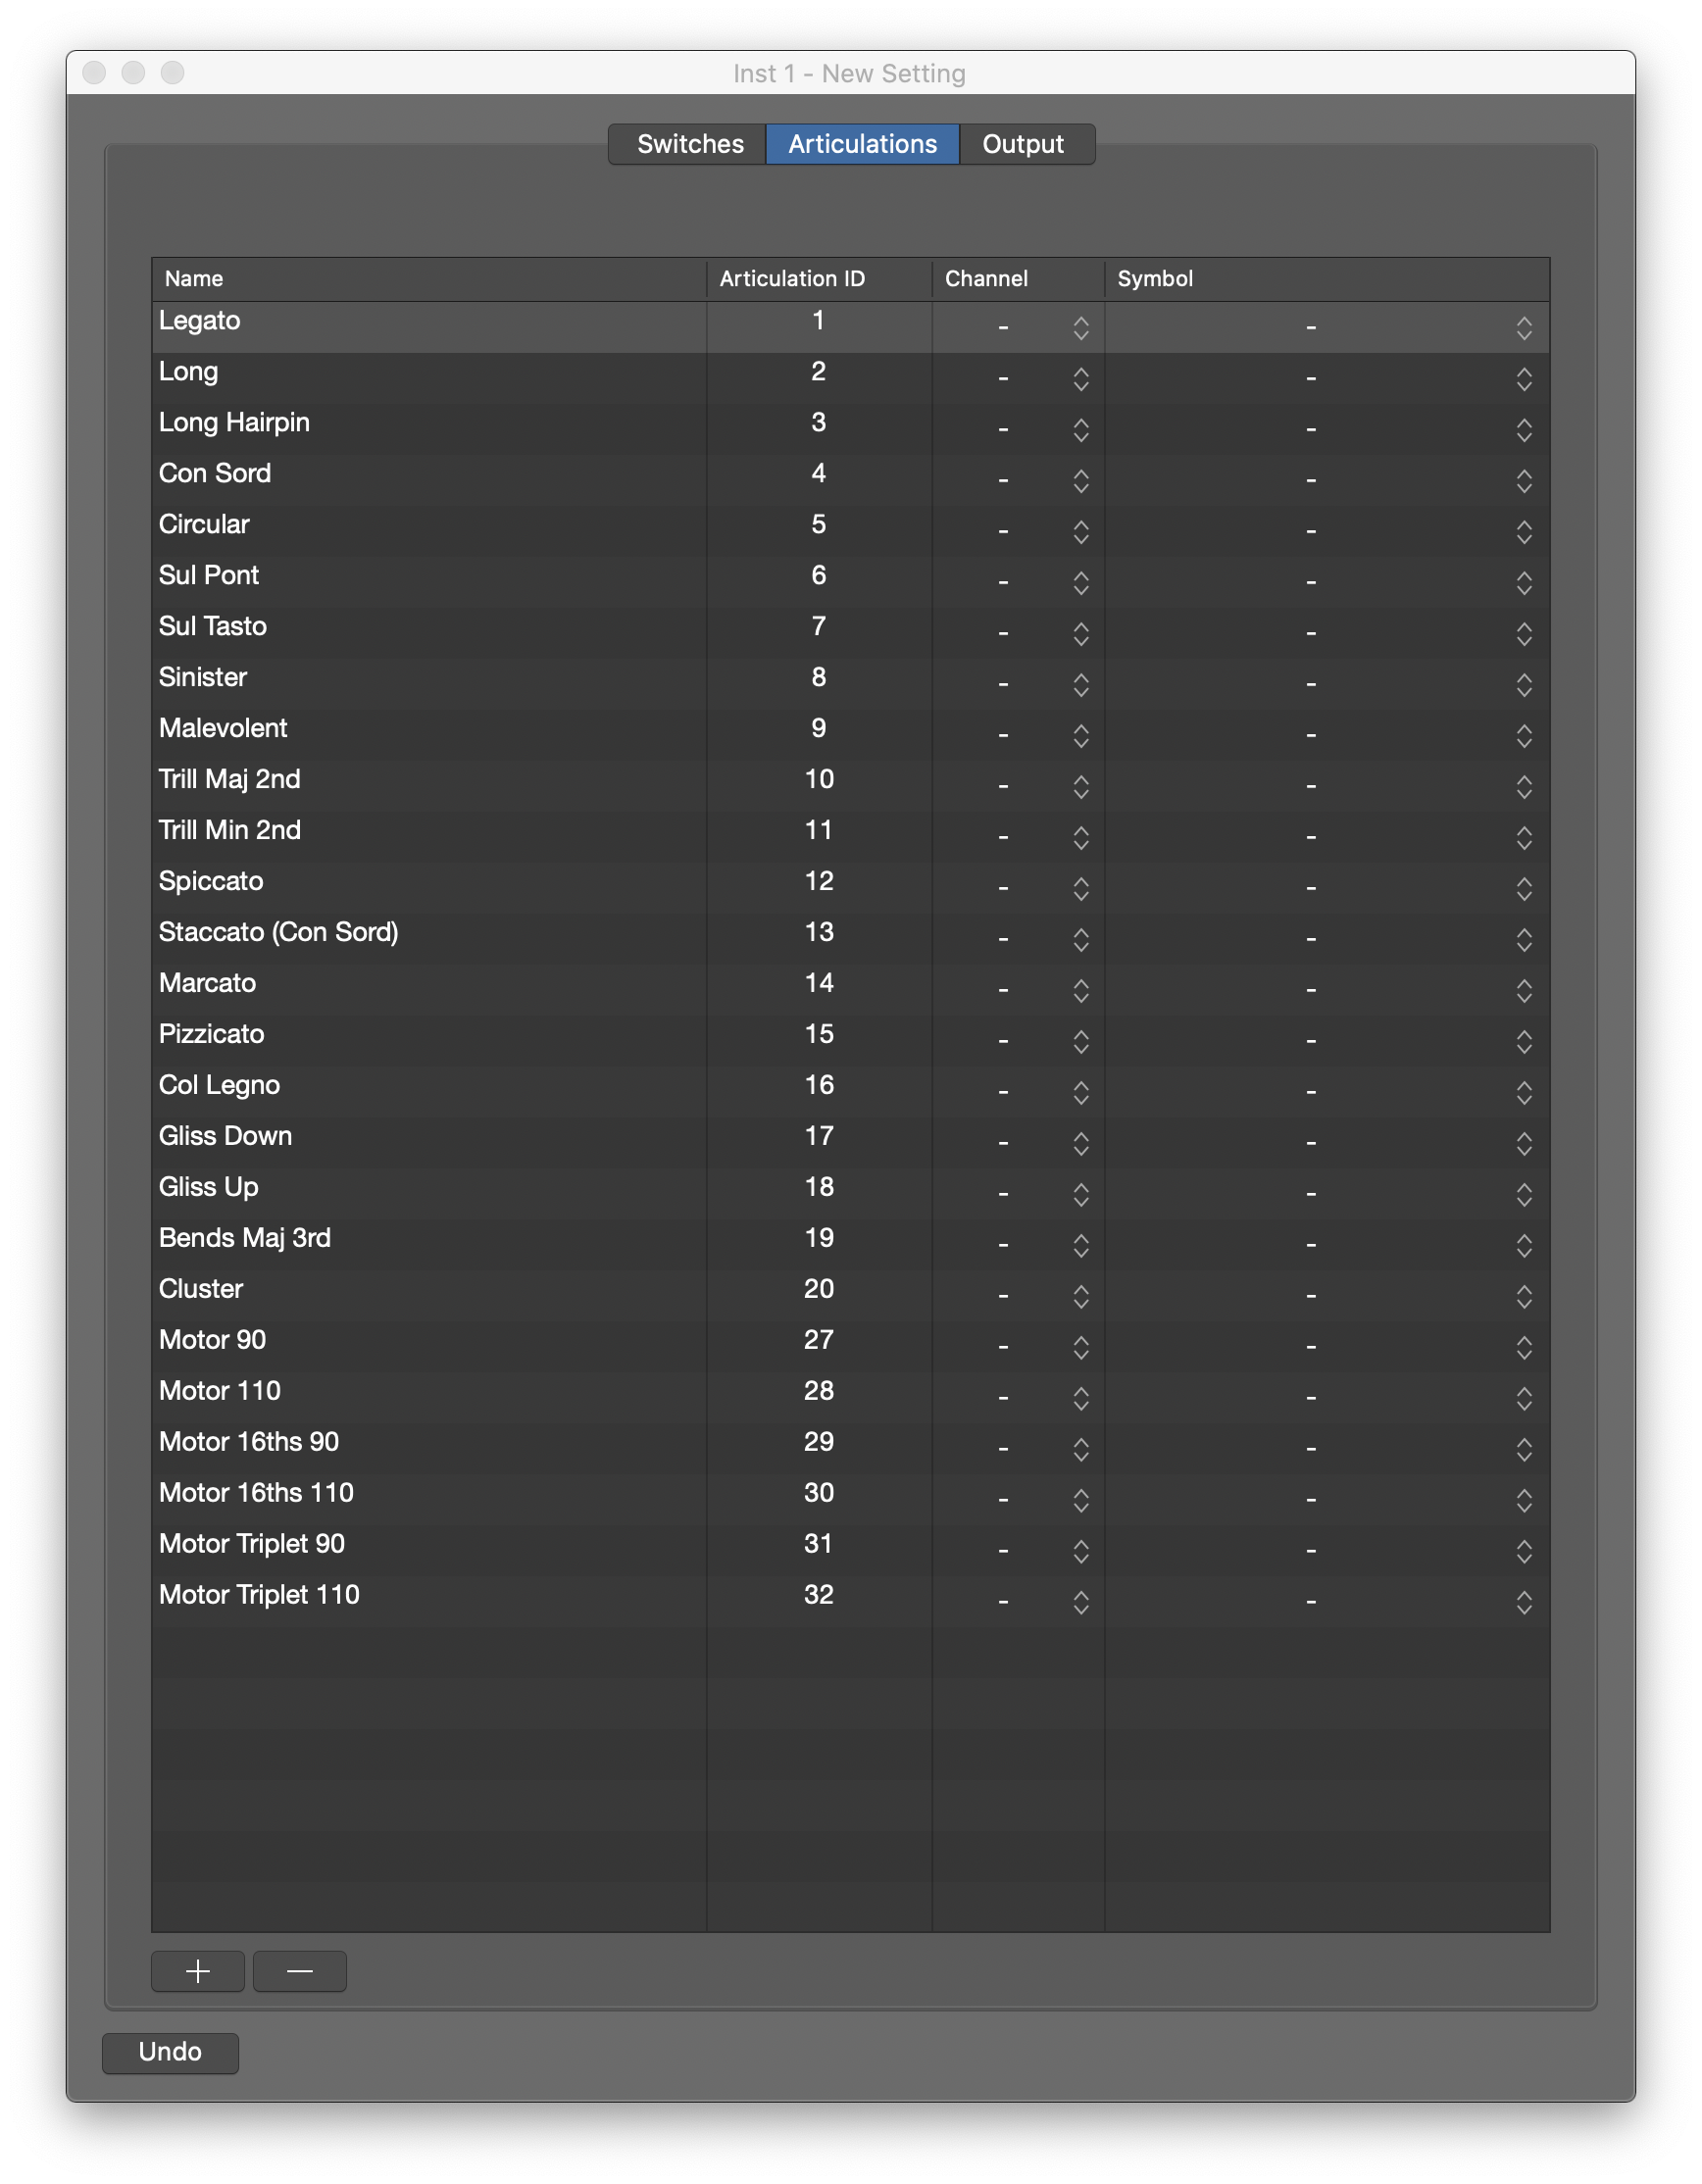
When a new Articulation Set is created, you will then see the menu below.
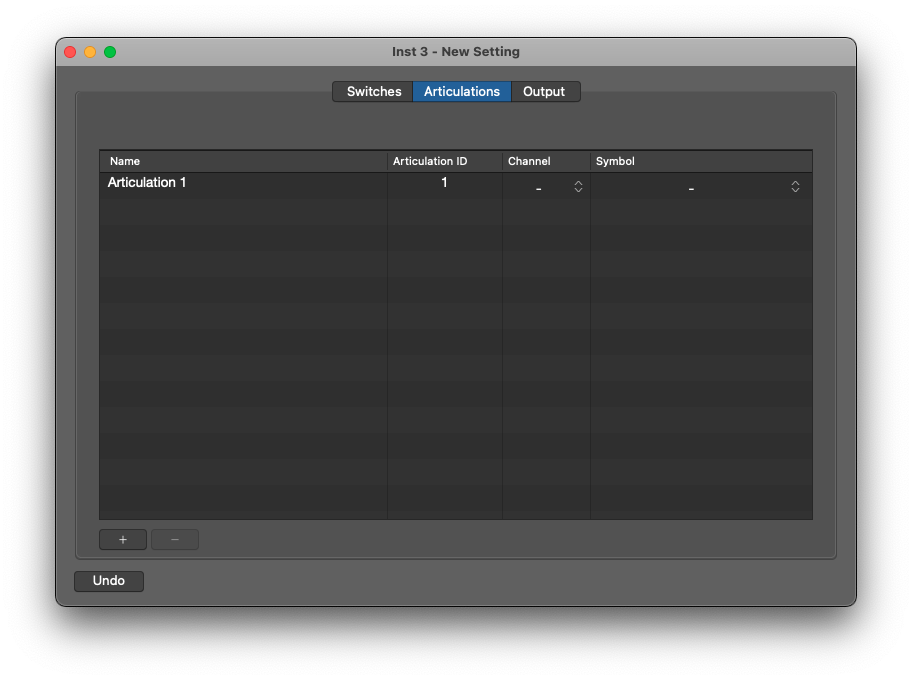
Name: Double click on the articulation name to change it. Type of the name and select enter. It is best to match the names shown in the library user interface to avoid getting muddled, but this is not a requirement.
Articulation ID: This will increment for each articulation you create
Channel: This is the MIDI Channel the articulation will be connected to. It is best to leave this blank, as this will mean the articulation set can be used with any MIDI Channel if you are using Logic's Multi-Timbral feature.
Symbol: This is the symbol that will appear in your score if you wish to export the score from Logic. It is not a requirement for keyswitching and does not need to be used.
(+): The plus button allows you to add an articulation.
(-): The minus button allows you to remove any articulation. You may find it quicker to create a larger template of all articulations and then whittle this down to the articulations you need.
Part 1 - Note Keyswitching
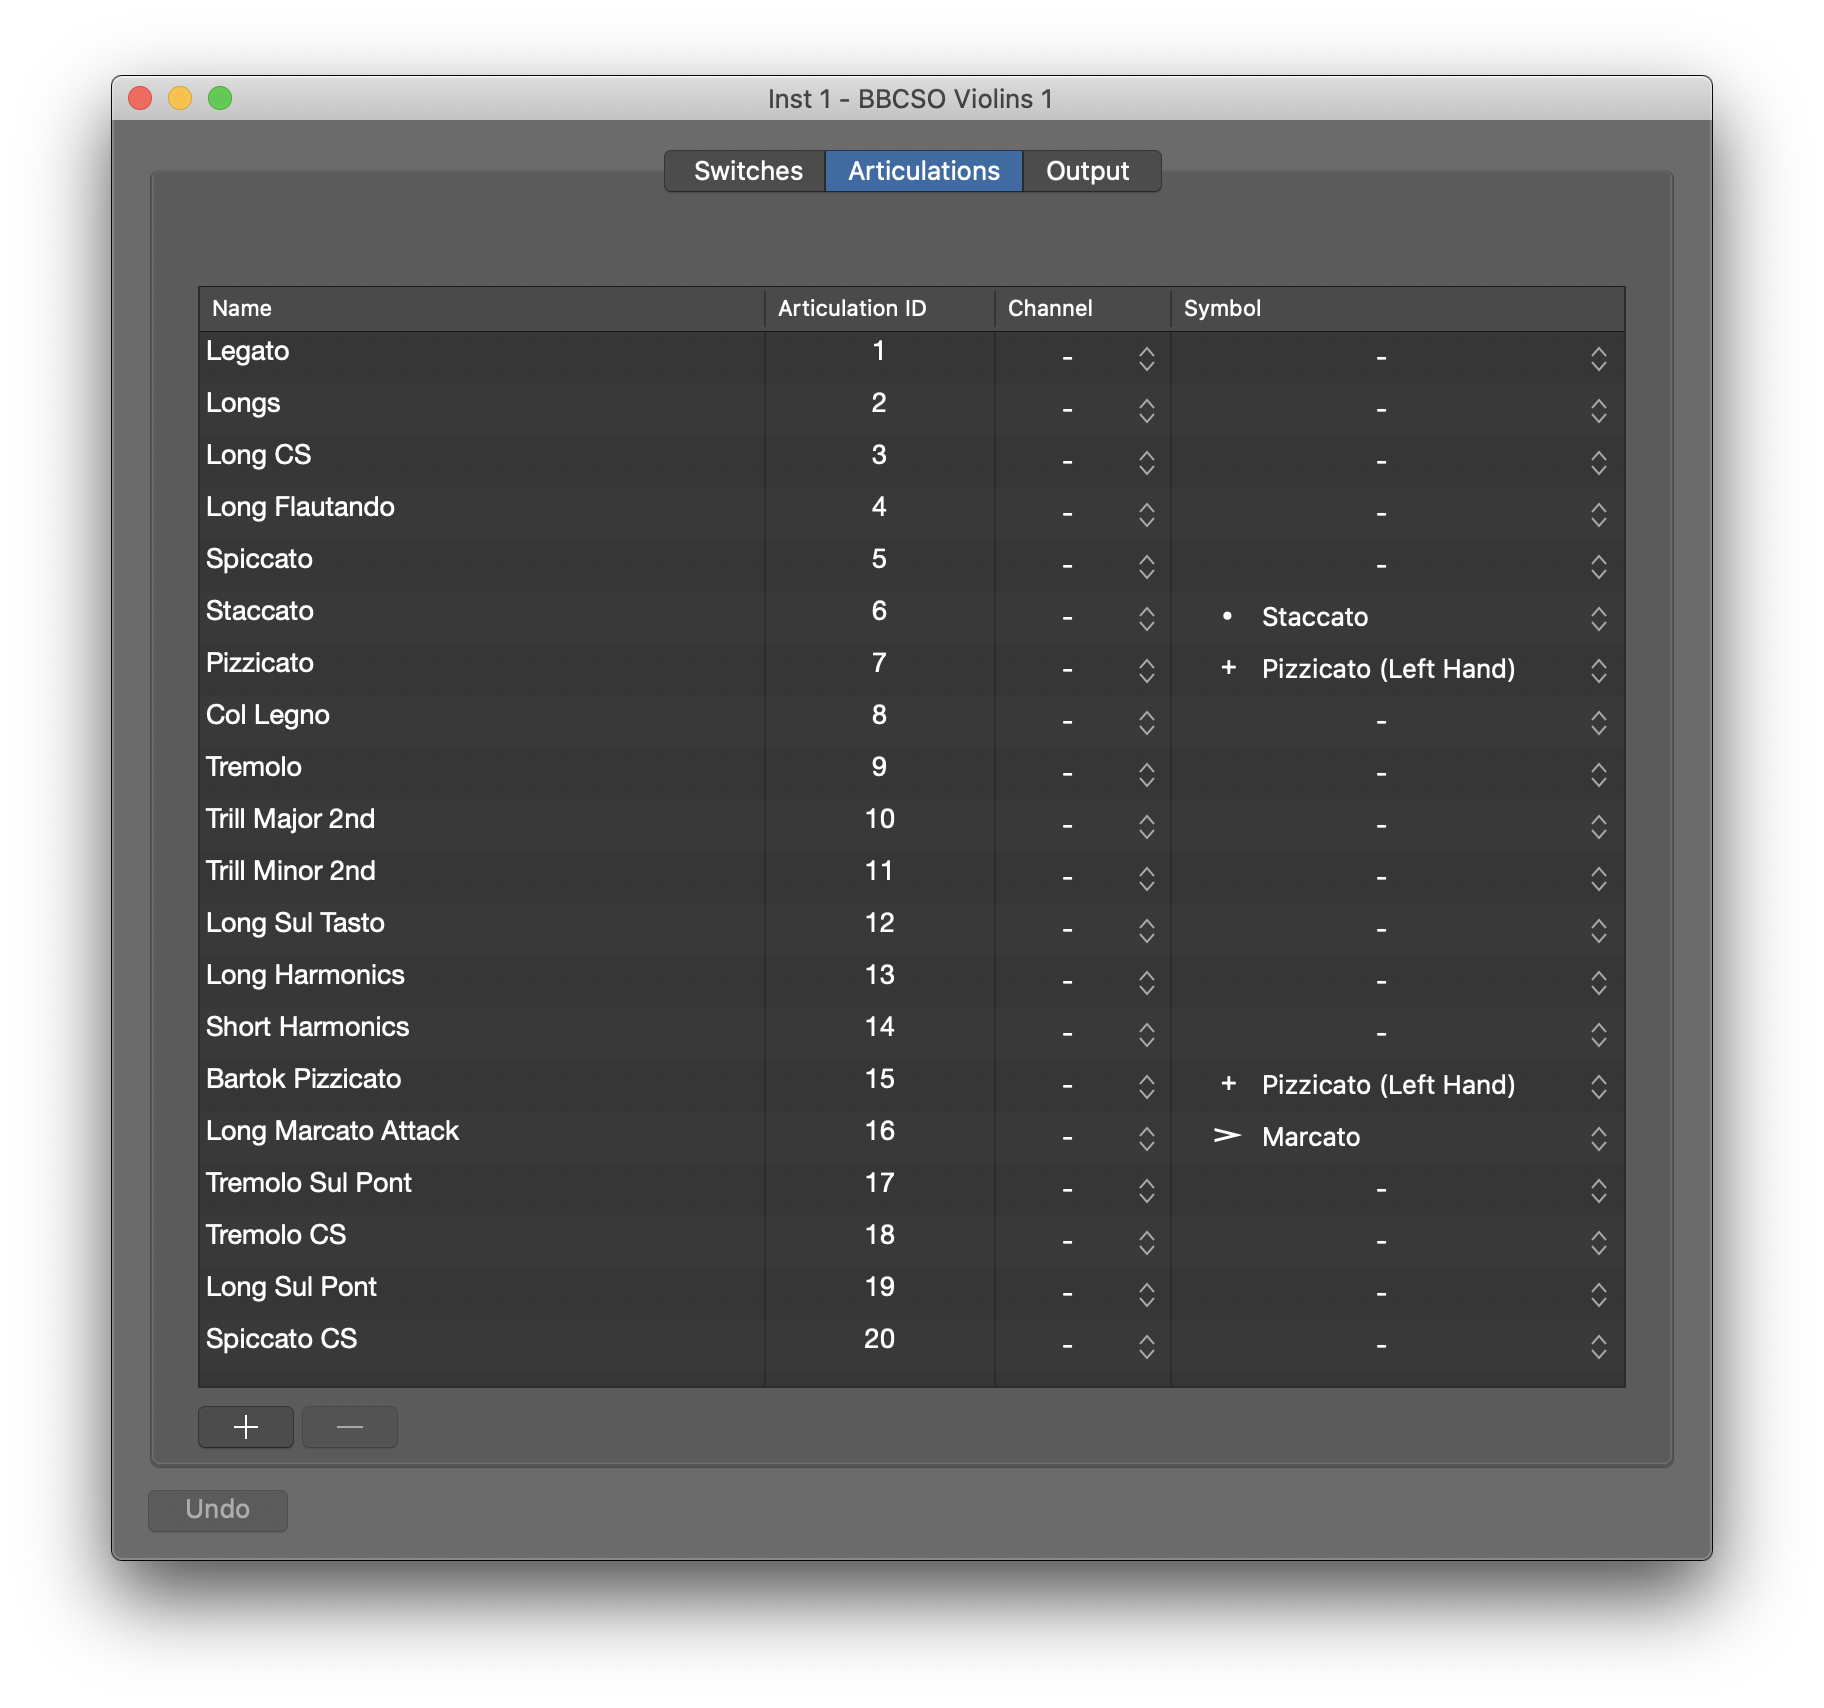
Here is an example of what an articulation menu might look like after inputting all of the Articulations (BBC SO Violins 1).
Outputting the Correct Keyswitch
The two main types of Keyswitches we recommend using are Note Values (for Spitfire dedicated plugin libraries) and UACC (when using Kontakt Multi's). In the image below, you will see the continuation of the Keyswitch Outputs from the Articulation list for the BBC SO Violins 1 above.
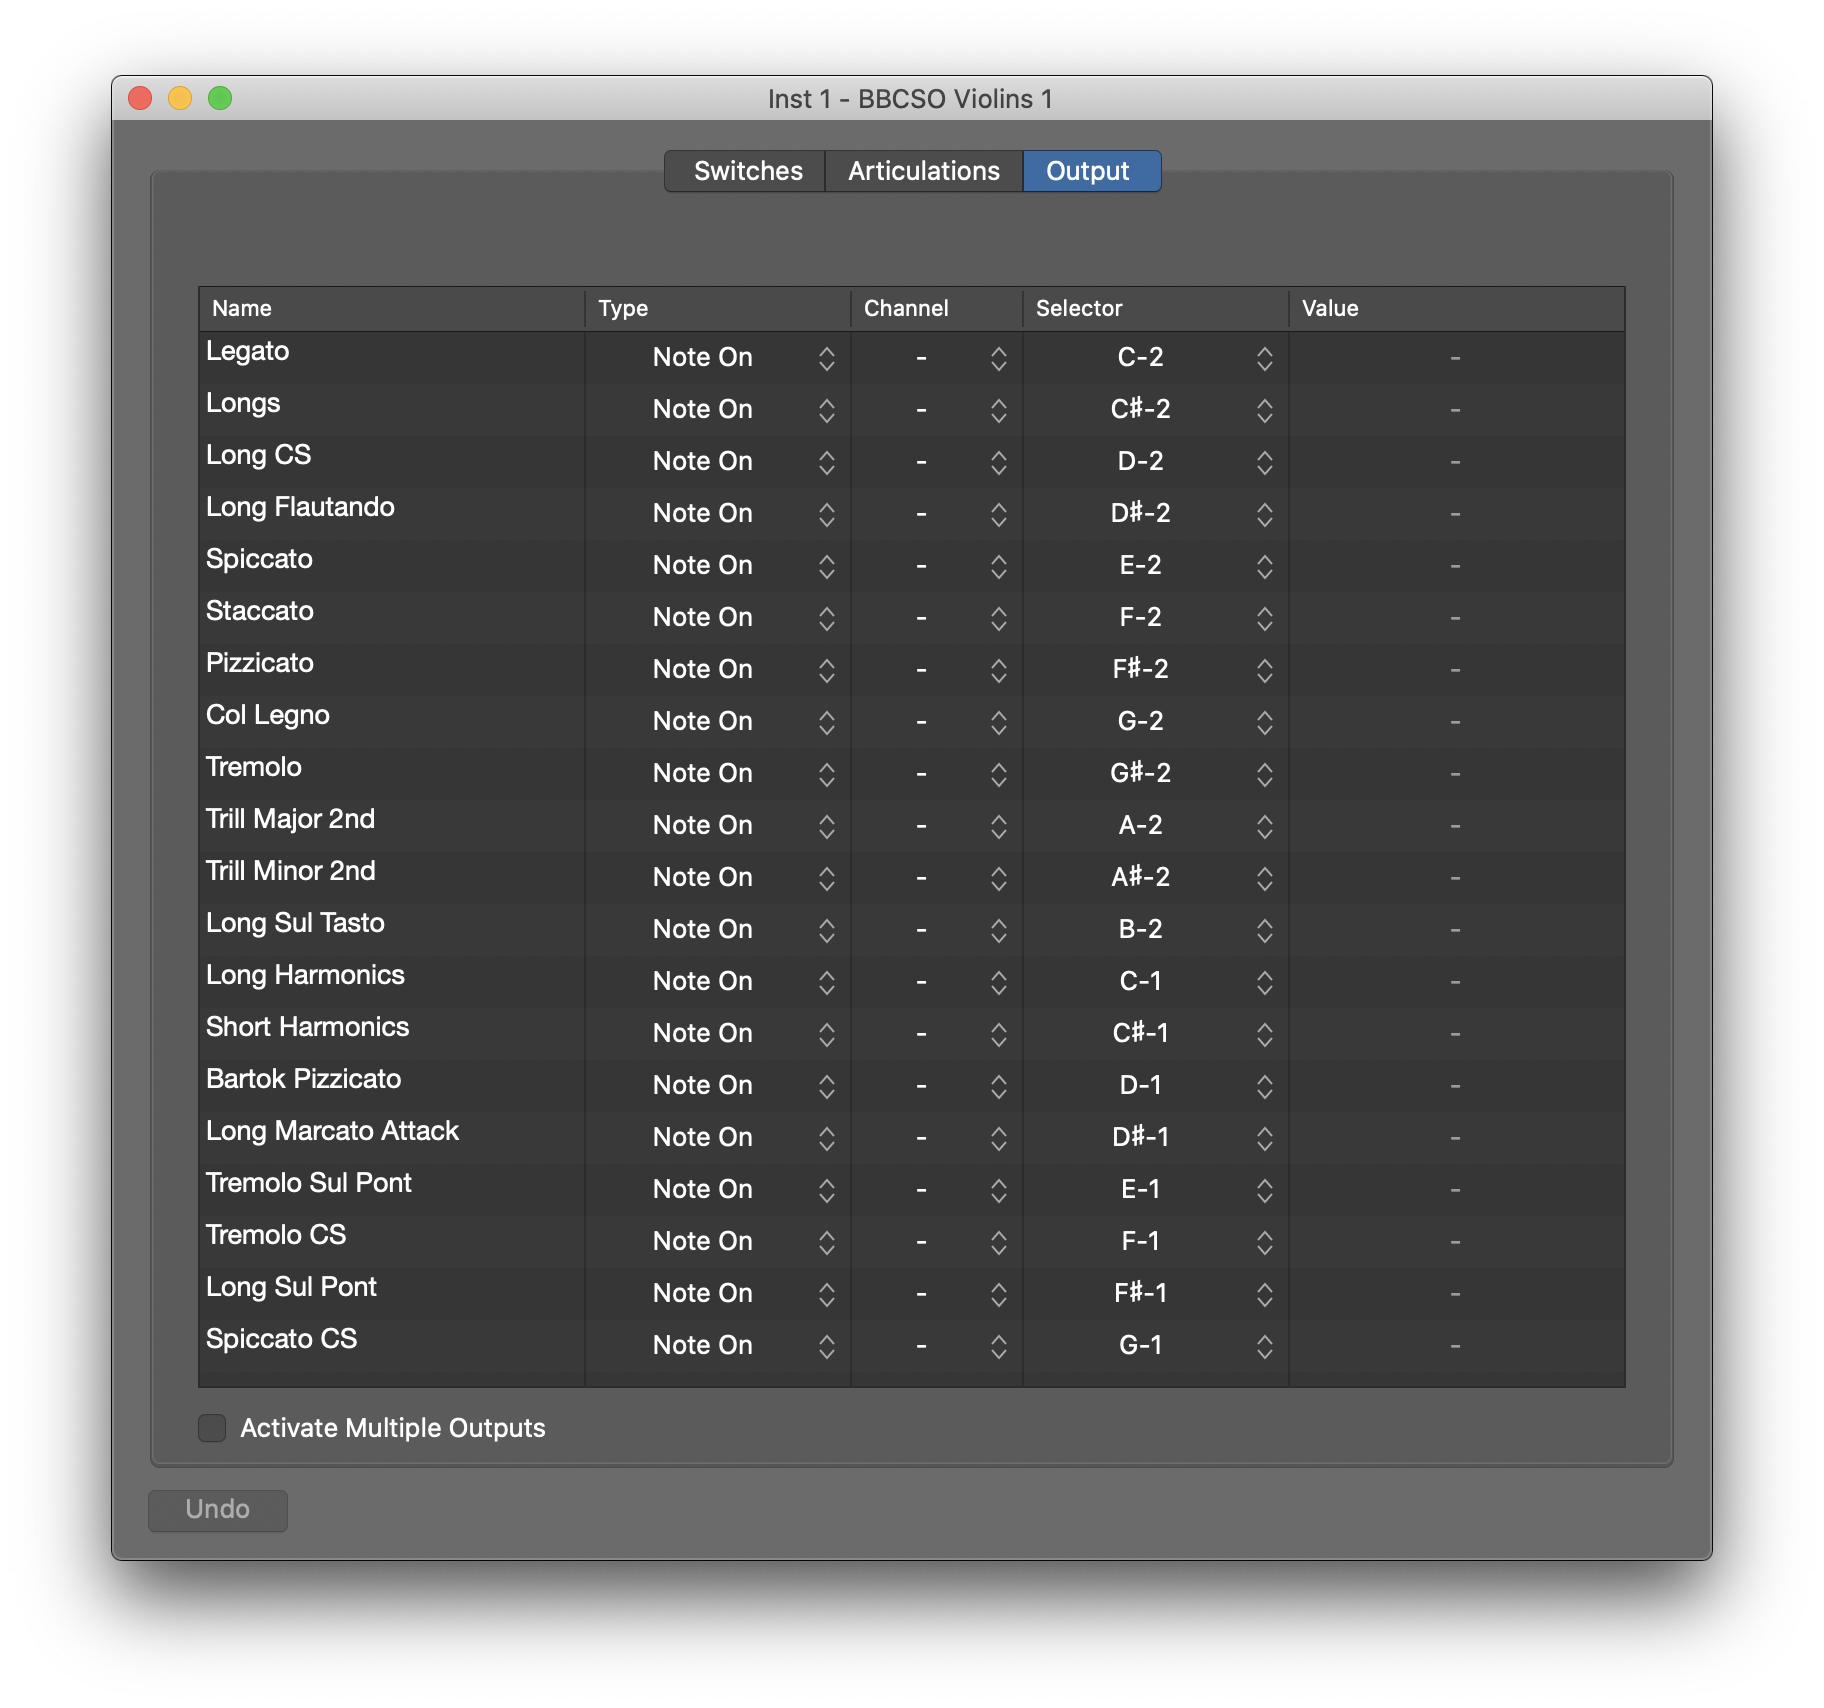
Name: The name entered into the Articulation list is automatically mirrored when you select the Output Menu.
Type - Note On: In this instance, we want to trigger the keyswitch by using the notes that are pre-programmed into the plugin. When the note (e.g. C-2) is selected, the plugin will keyswitch to the technique associated with that value (in this case Legato).
Channel: Again, this should be left blank if you are not using multiple Keyboards or MIDI Devices for different purposes.
Selector: As we have chosen Note On the selector in this instance is the note associated with the Keyswitch.
Value: It is not necessary to write a specific value in this instance, as we are only looking to hit one specific note.
How do I know what Notes are connected to which Techniques?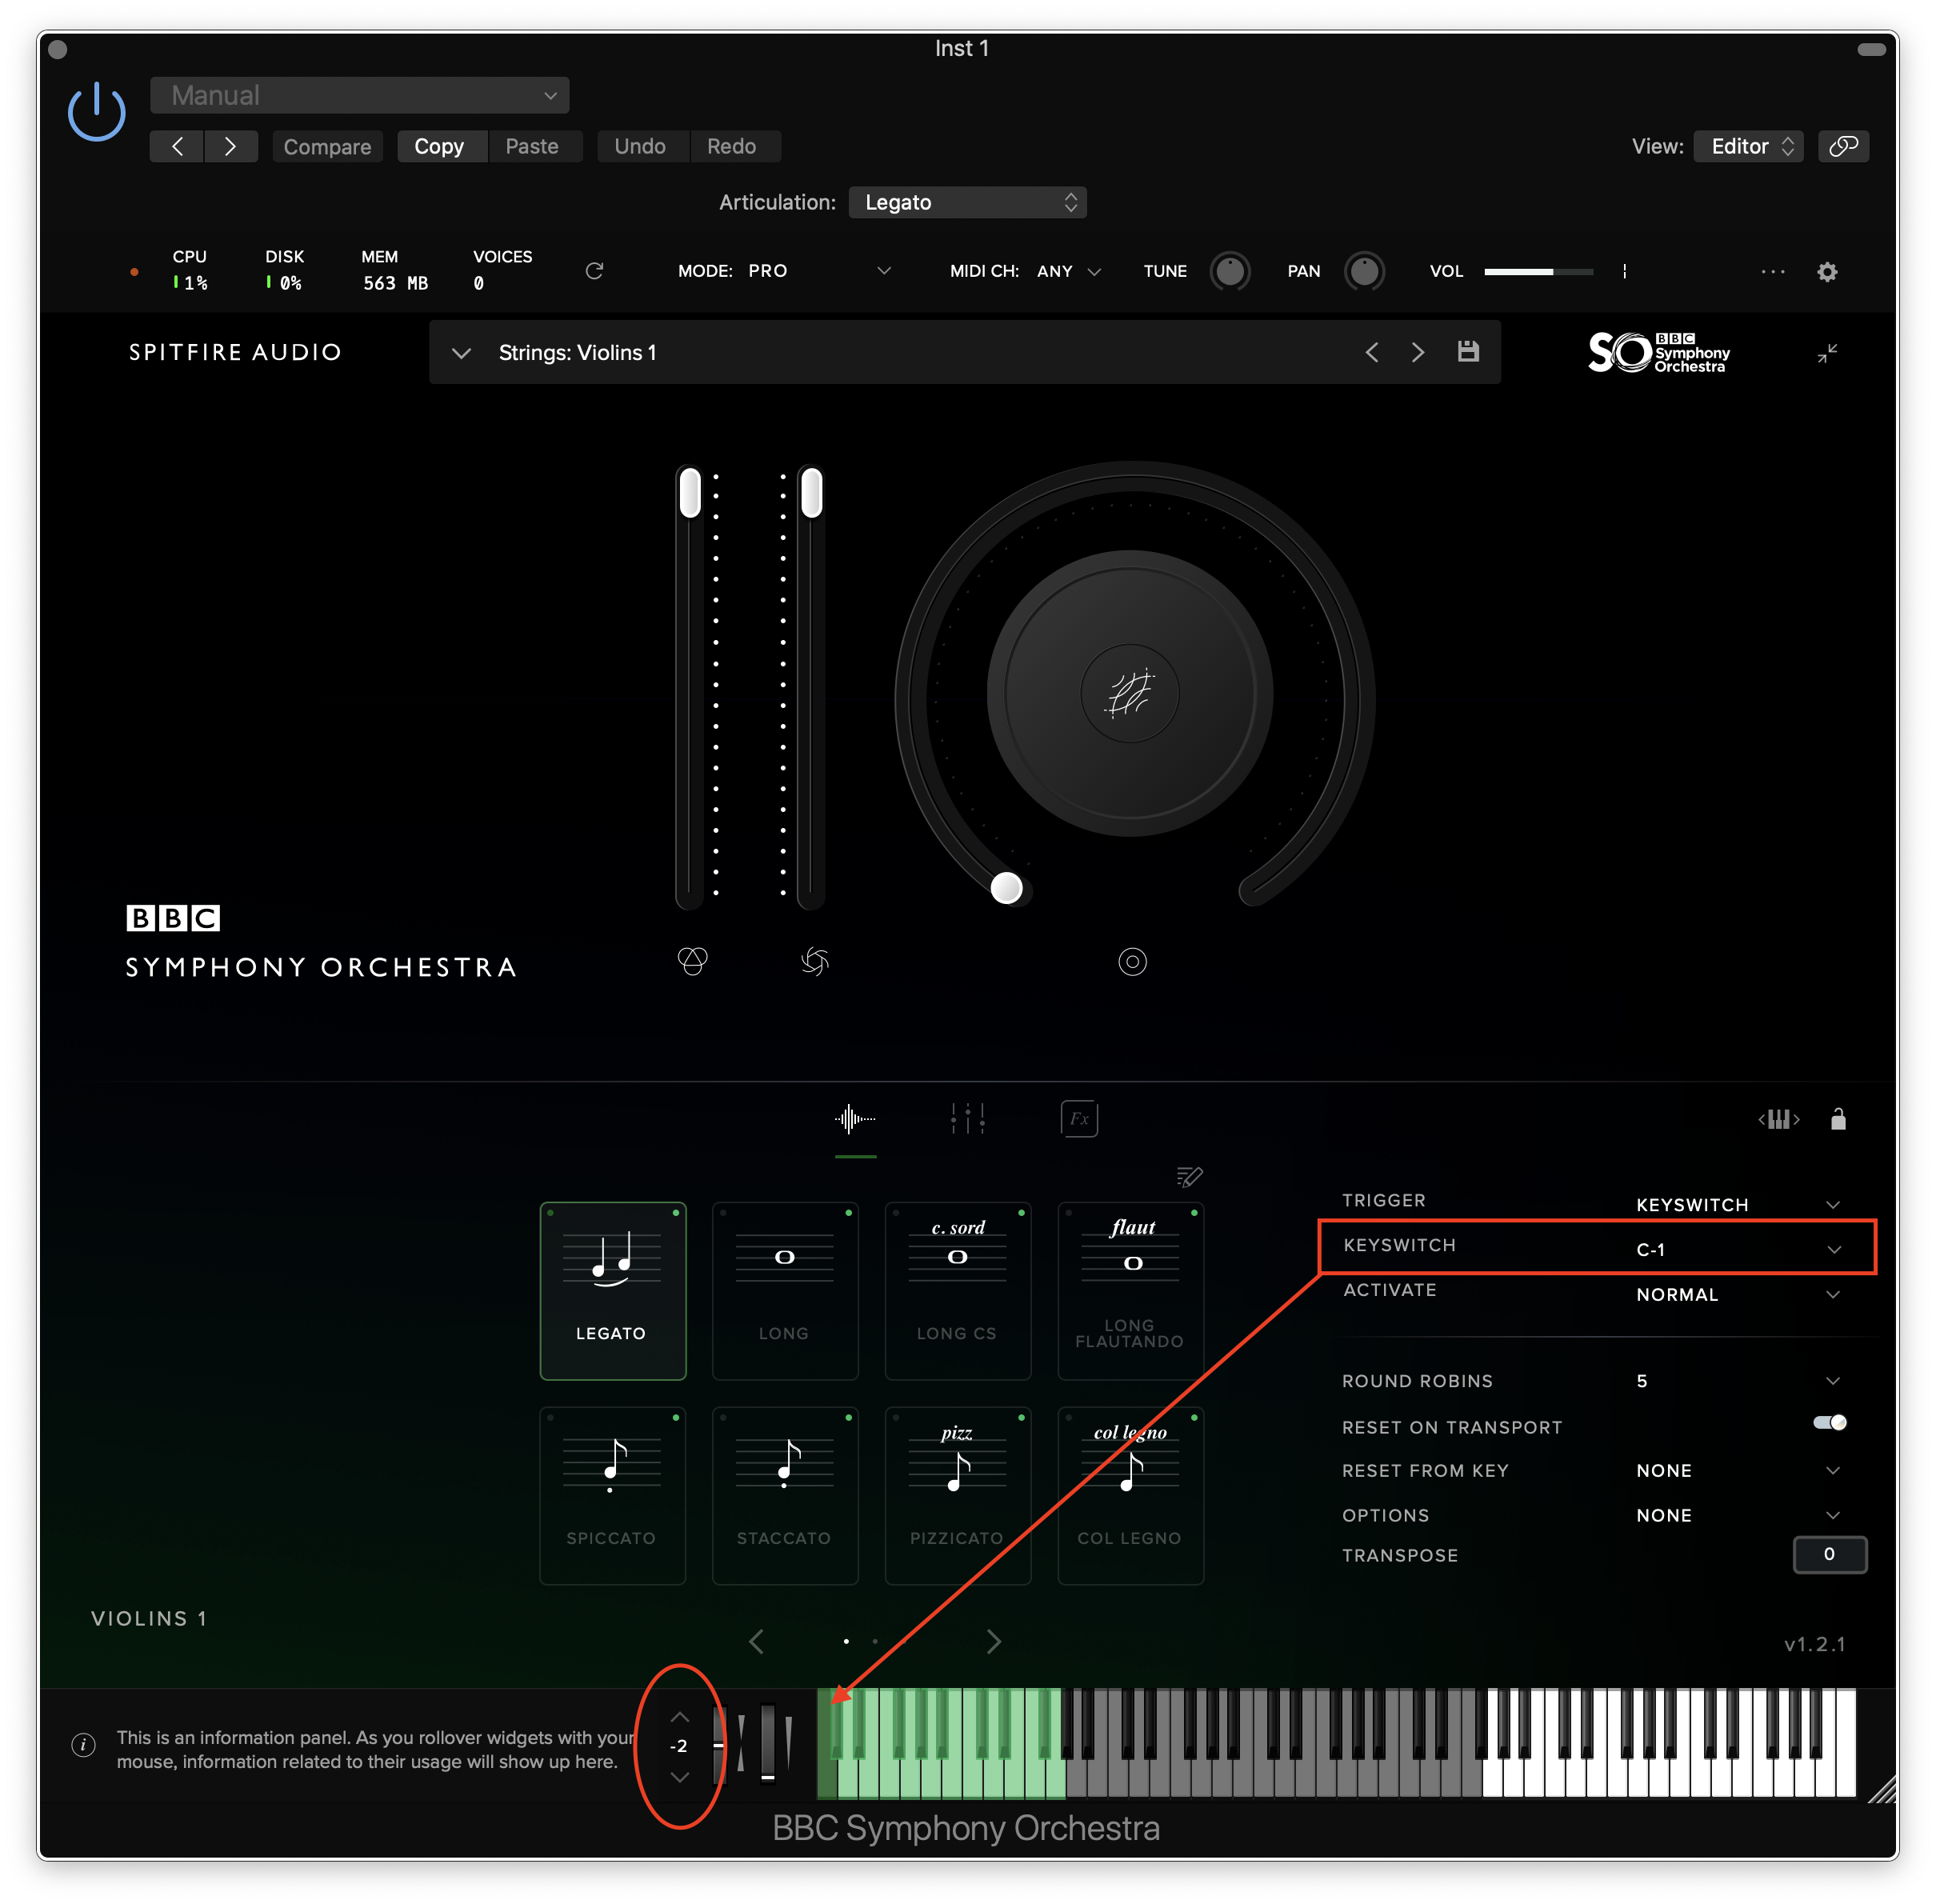
The keyswitch is shown to the side of the plugin as shown above. The plugin is set to Middle C = C4, whilst Logic is set to Middle C = C3, so in this instance C-1 is actually C-2. You can navigate to the Keyswitch keys at the bottom end of the Digital Keyboard by clicking on the down toggle (circled).
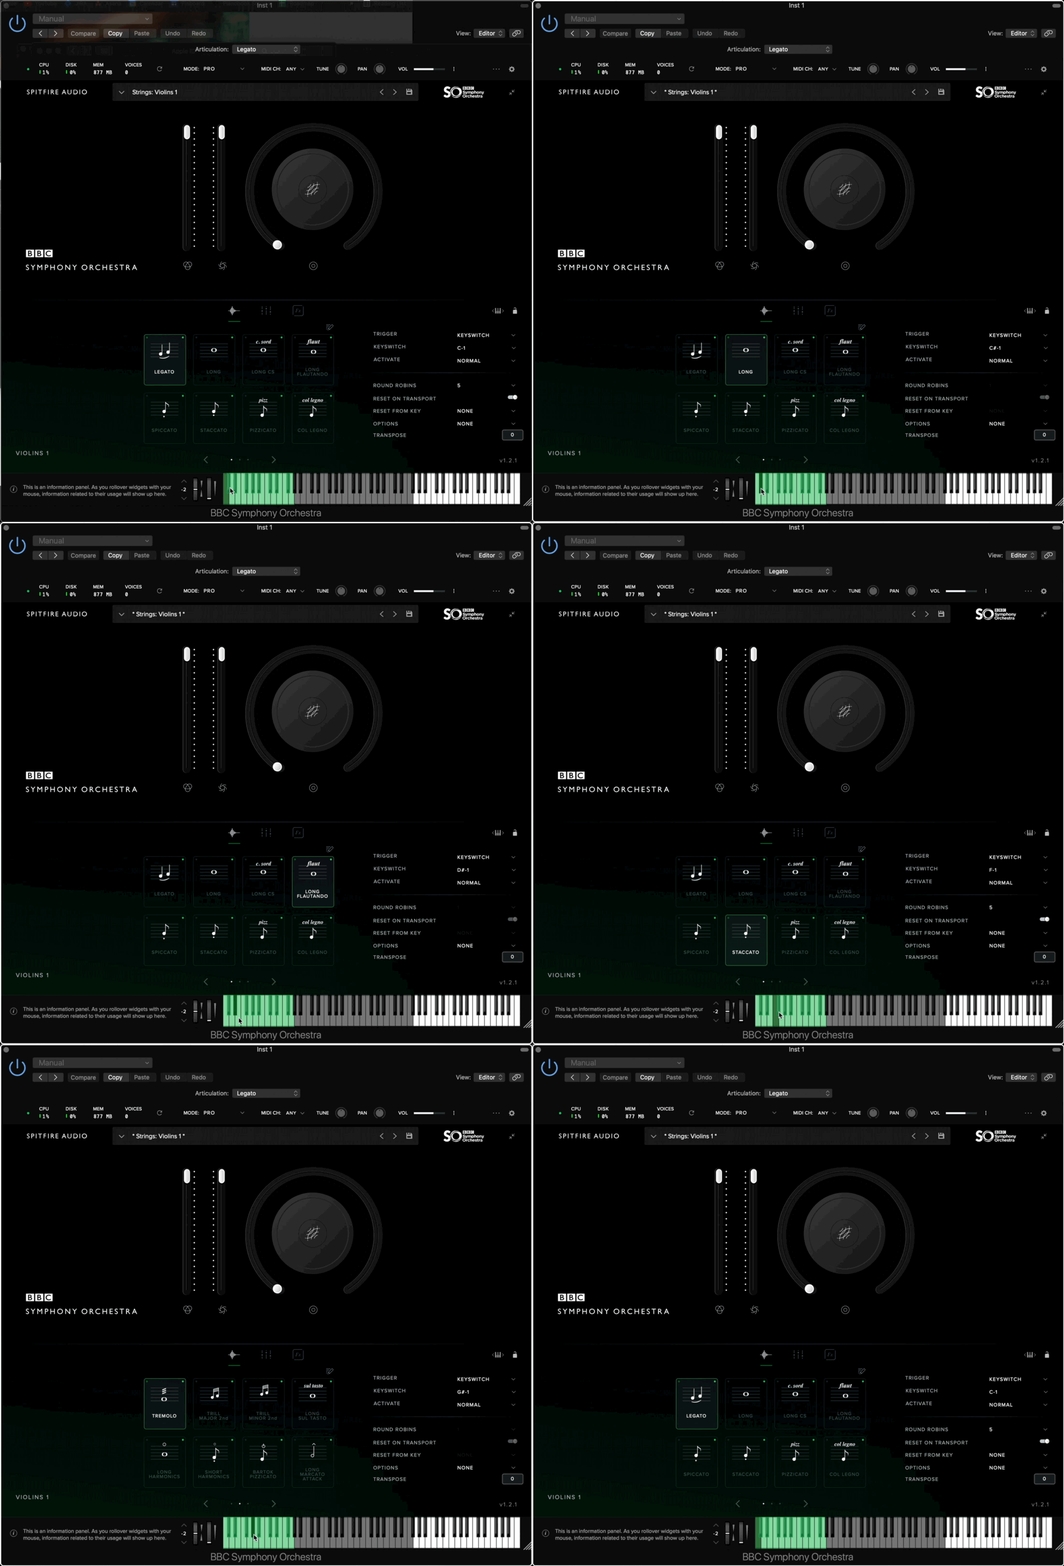
4. Using Your New Articulation Set
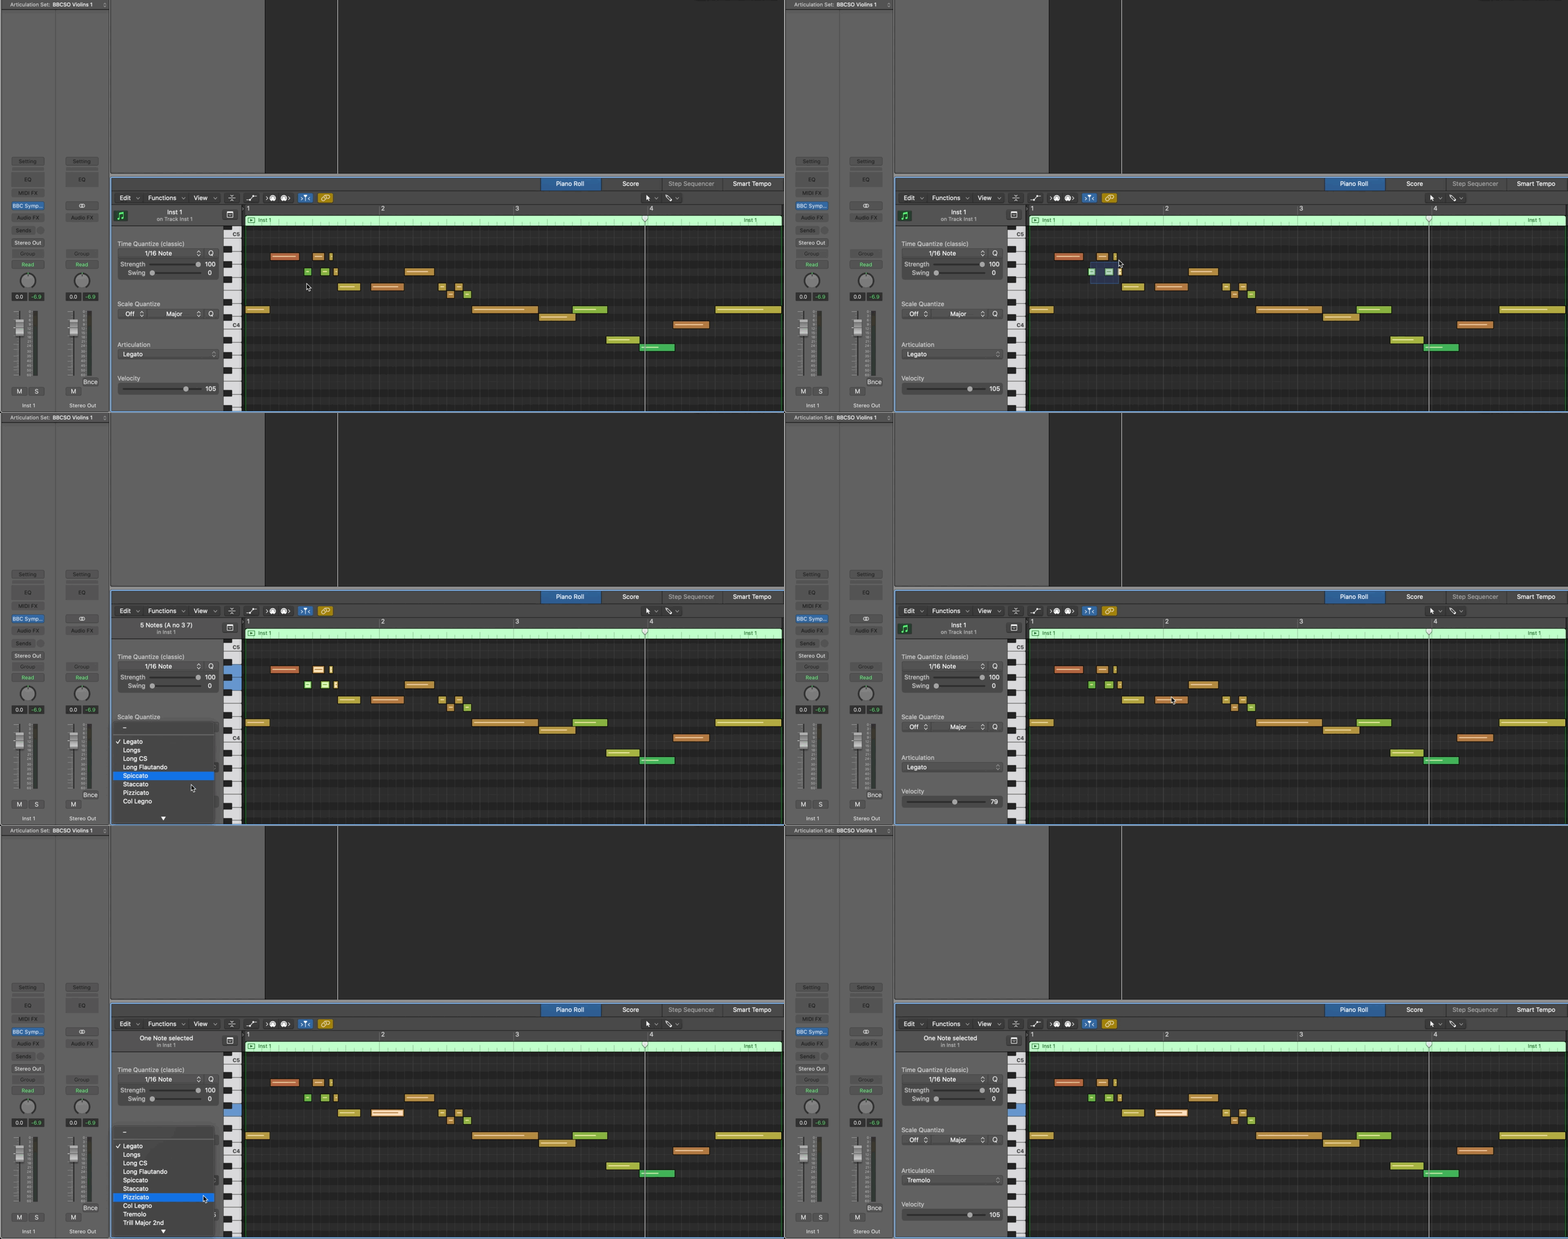
Now that the Articulation Map has been set up, you should see a dropdown in your Piano Roll (which can be opened with cmd+E). Highlight the specific notes you wish to keyswitch, and then select the relevant technique from the menu. Note that the menu list is generating from your Articulation Names within the Set- which is why it is recommended to keep these consistant with the technique names in the library.
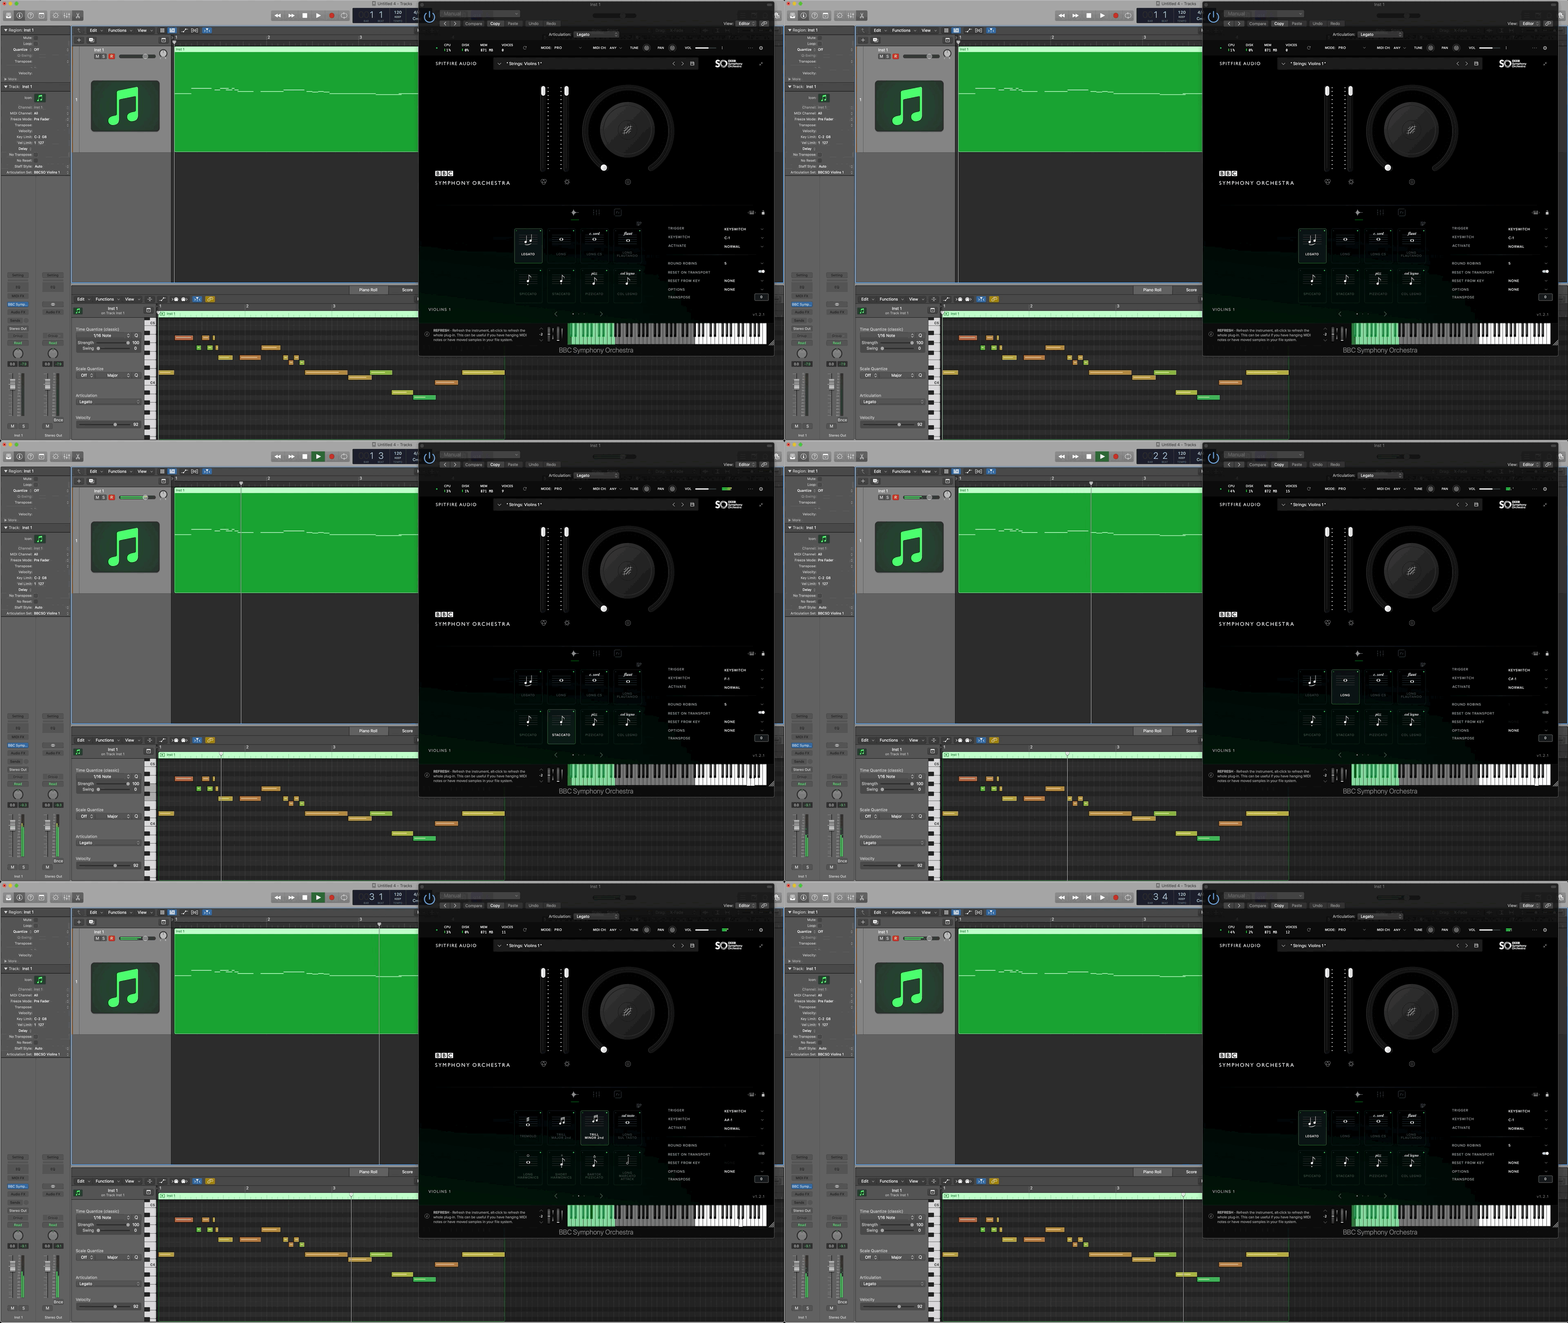
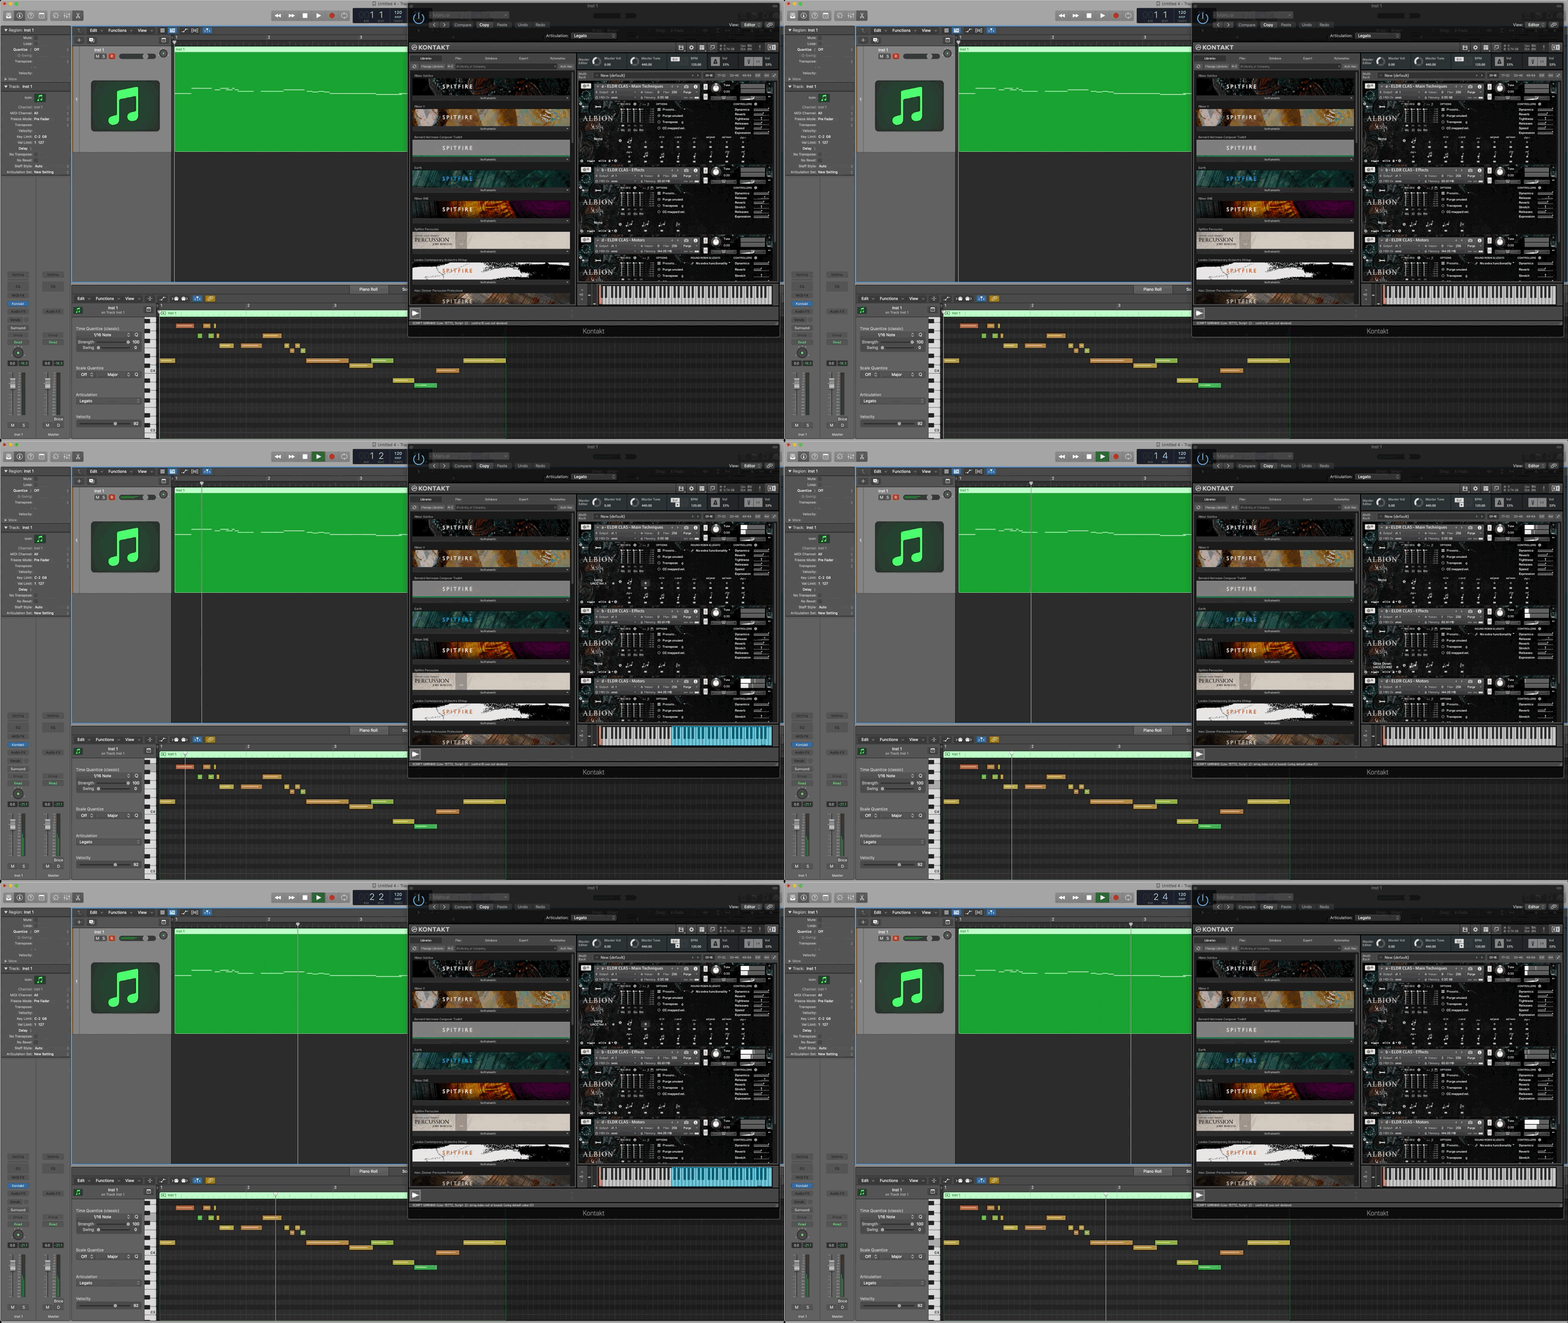
Now when you playback your MIDI file, the keyswiches will occur according to your programming. The plugin will default to the last played keyswitch, so to avoid the wrong keyswitch being played at the start of the passage, make sure you select a keyswitch for every note.
Part 2 - UACC Keyswitching
If you wish to use a Kontakt Multi to cover all possible articulations for an instrument within one of our Kontakt libraries, you should use UACC Keyswitching.
Create a Kontakt Multi
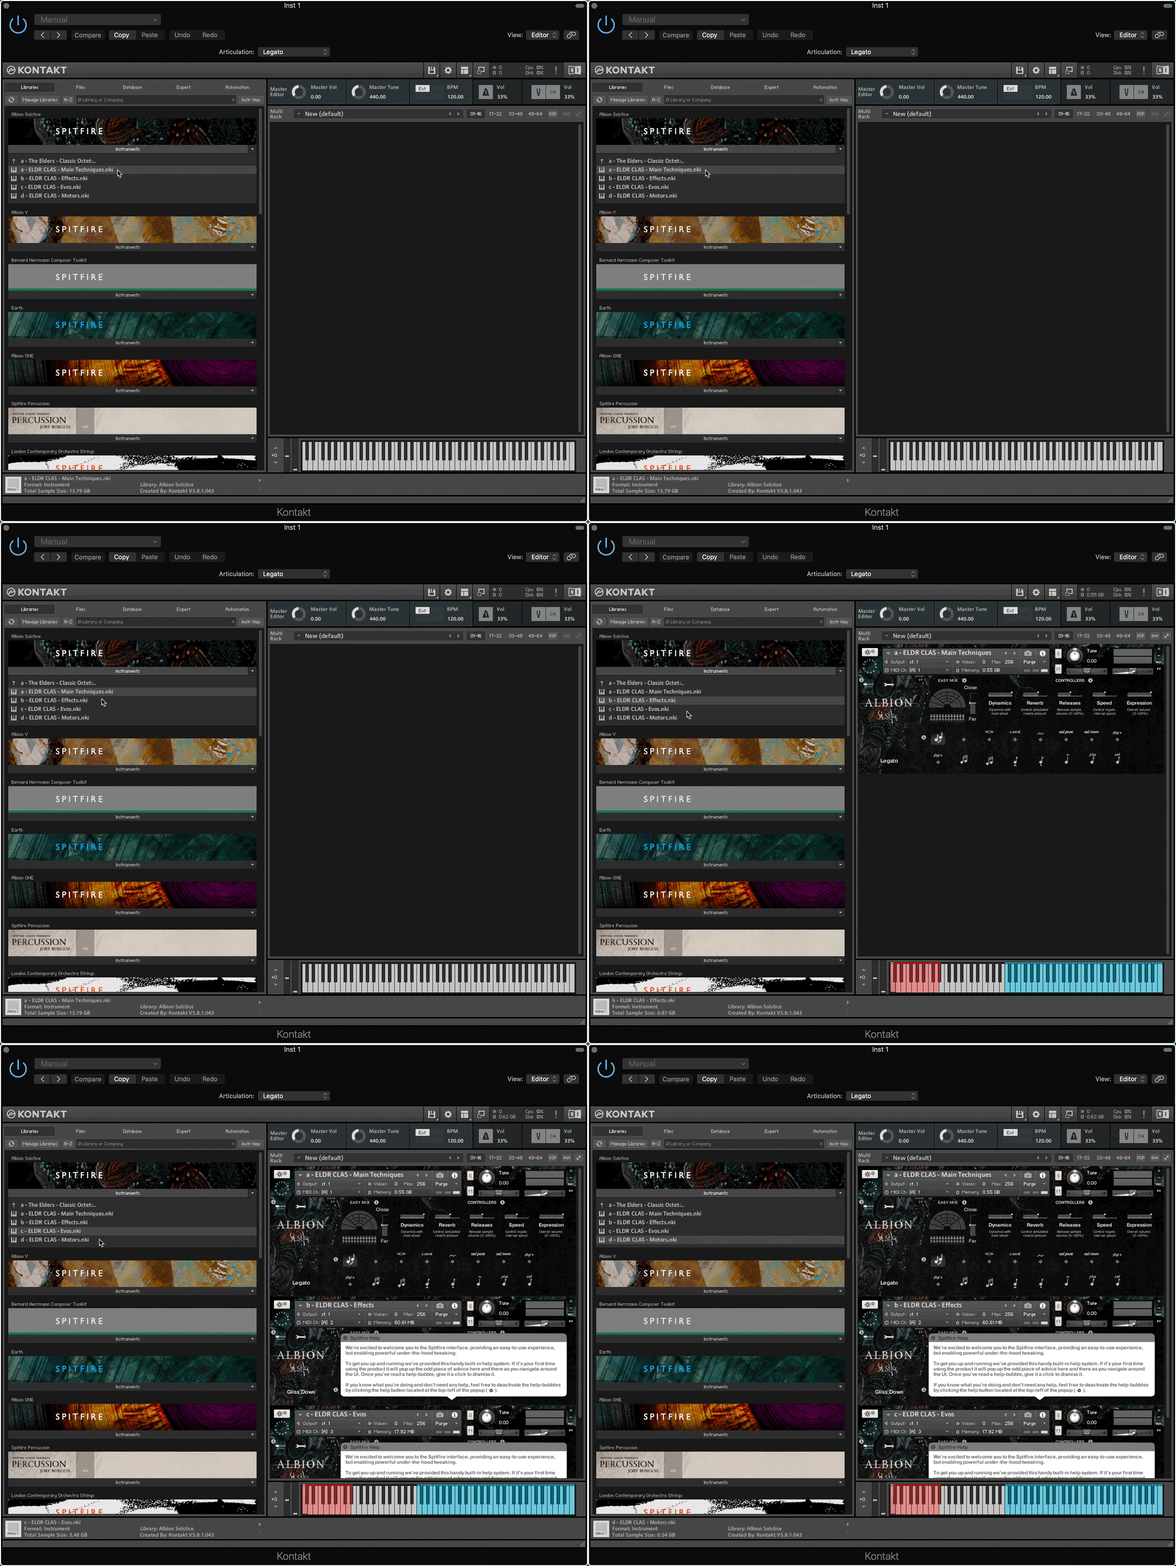
To set this up, you will first need to create a Kontakt Multi by opening up all the instances of the library you require. For example, in Albion Solstice there a four separate patches for the Strings with different articulations, and by clicking on these, we can open them all up in sequence within the plugin.
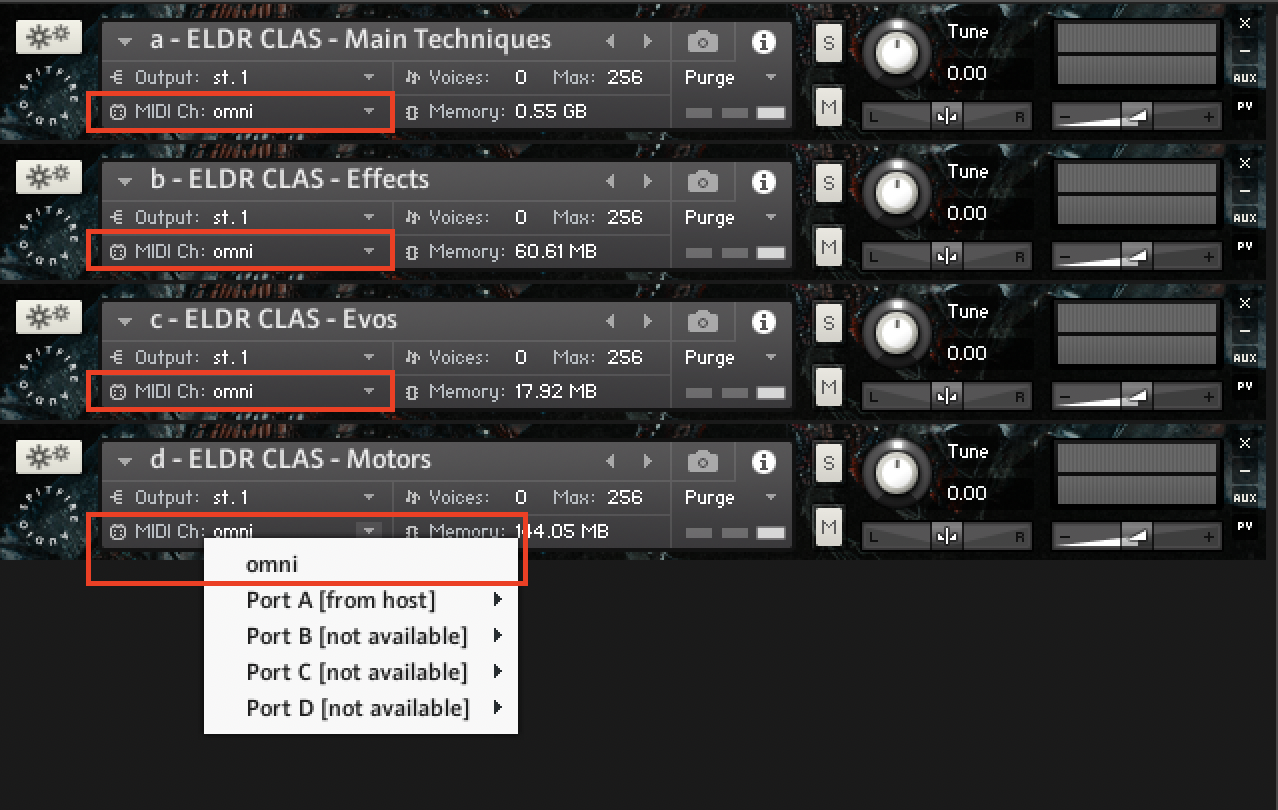
If you are not using a Multi-Timbral layout (see here) you should set each the MIDI Channel for each instance to Omni.
2. How to set up UACC Keyswitching
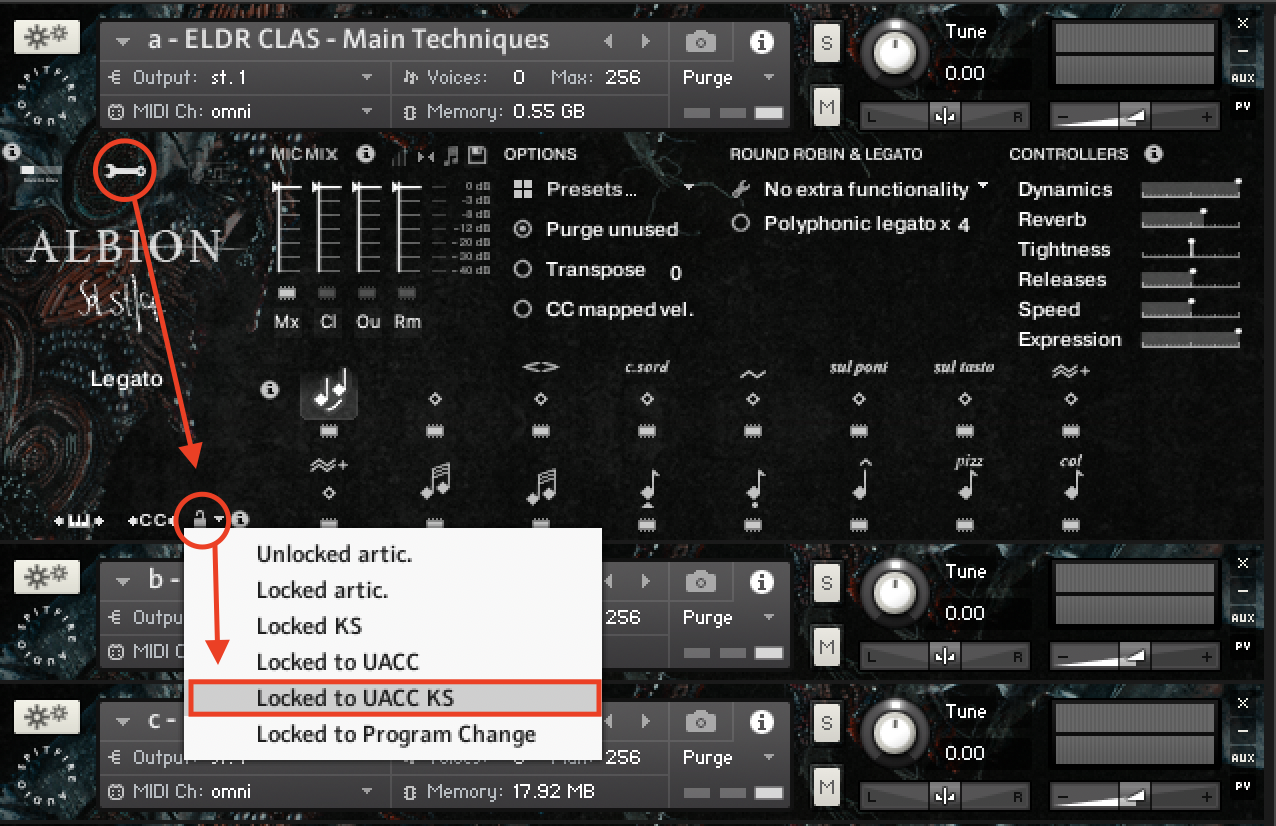
Within each instance, click on the wrench icon to open the Expert View. From here find the small padlock icon towards the bottom of the interface, and select the dropdown. From the menu, select Lock to UACC KS.
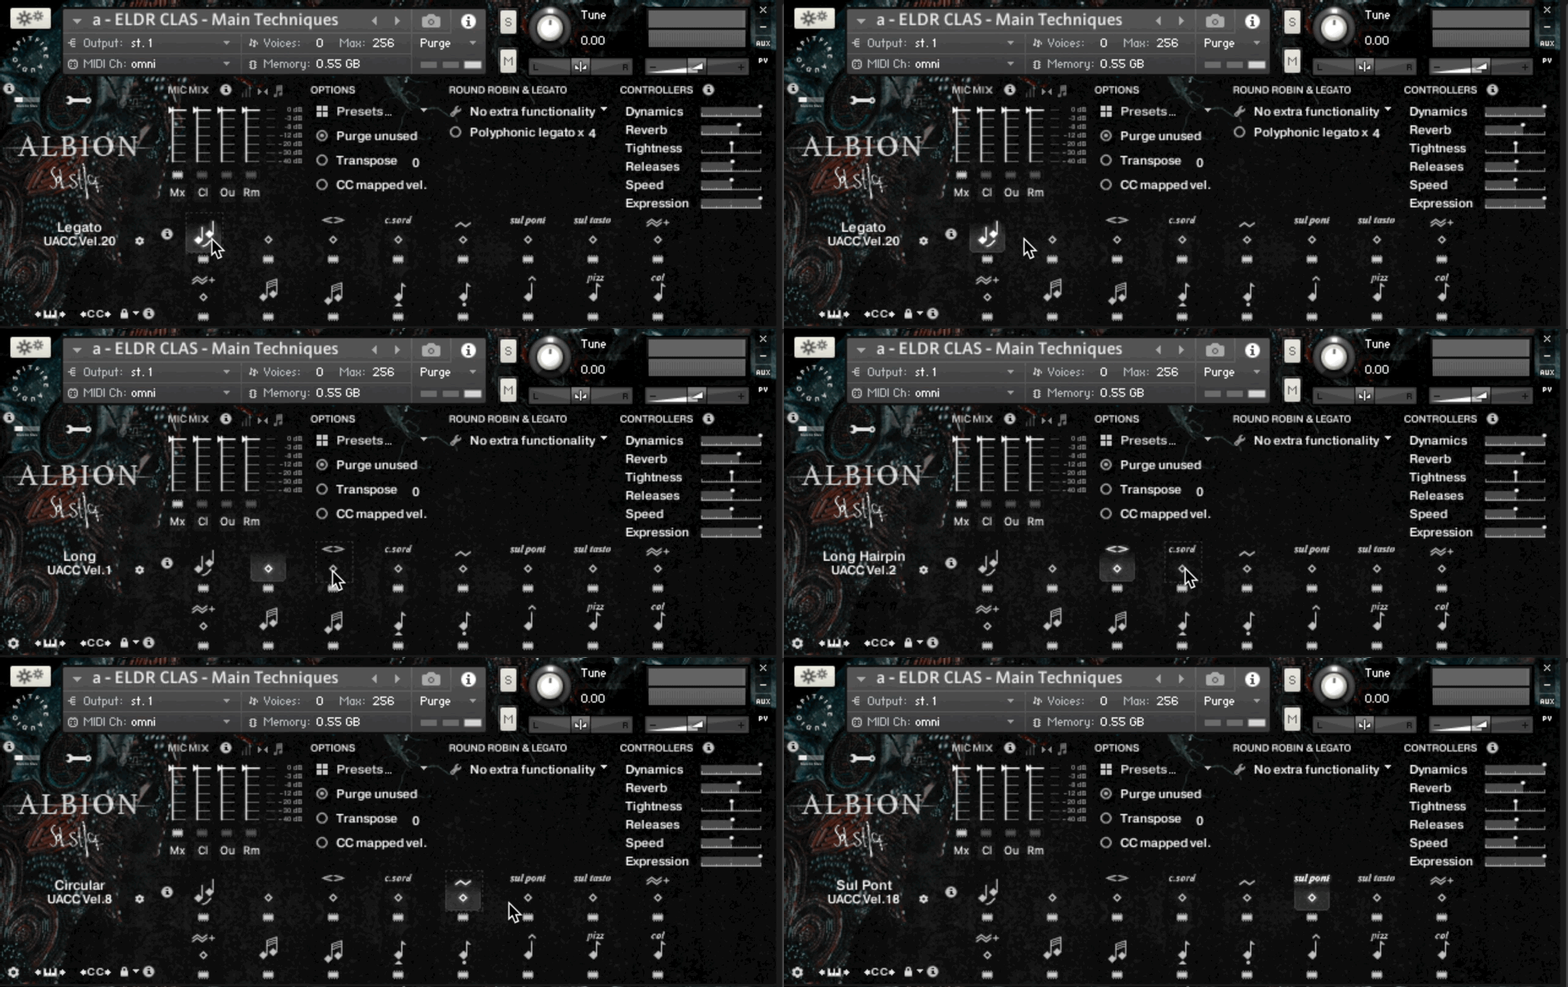
Once UACC KS is selected, each Articulation will now have a unique velocity number, shown on the left hand side. These are the velocity values we will need later on in order to activate each technique.
Creating the UACC Articulation Set
First, create the open a new articulation set as above and enter in the articulation names for the patches you wish to use. As before, you should try to keep your naming consistent with the plugin to avoid any confusion later on. Below is an example with all the Strings - Classic Octet articulations listed, note that the channel should remain blank if using an Omni Output. If using a Multi-Timbral Output, the channel should be for the specific MIDI channel you selected.
 Once complete, go to the Output Menu where the following should be selected.
Type: Controller - by default MIDI CC 32 is used for UACC Keyswitching. This can be changed by ctrl + clicking on the <cc> icon next to the Keyswitching padlock. However, it is highly recommended not to change this figure- as it will be overwritten by any updates to the library.
Channel - This should be blank if using omni out, or the specific channel number you have used for each instance of the library in the Kontakt Multi and their specific set of articulations only.
Selector - This is the Control Change used, which as mentioned above is 32.
Value - This is the value shown in the left hand panel (see above).
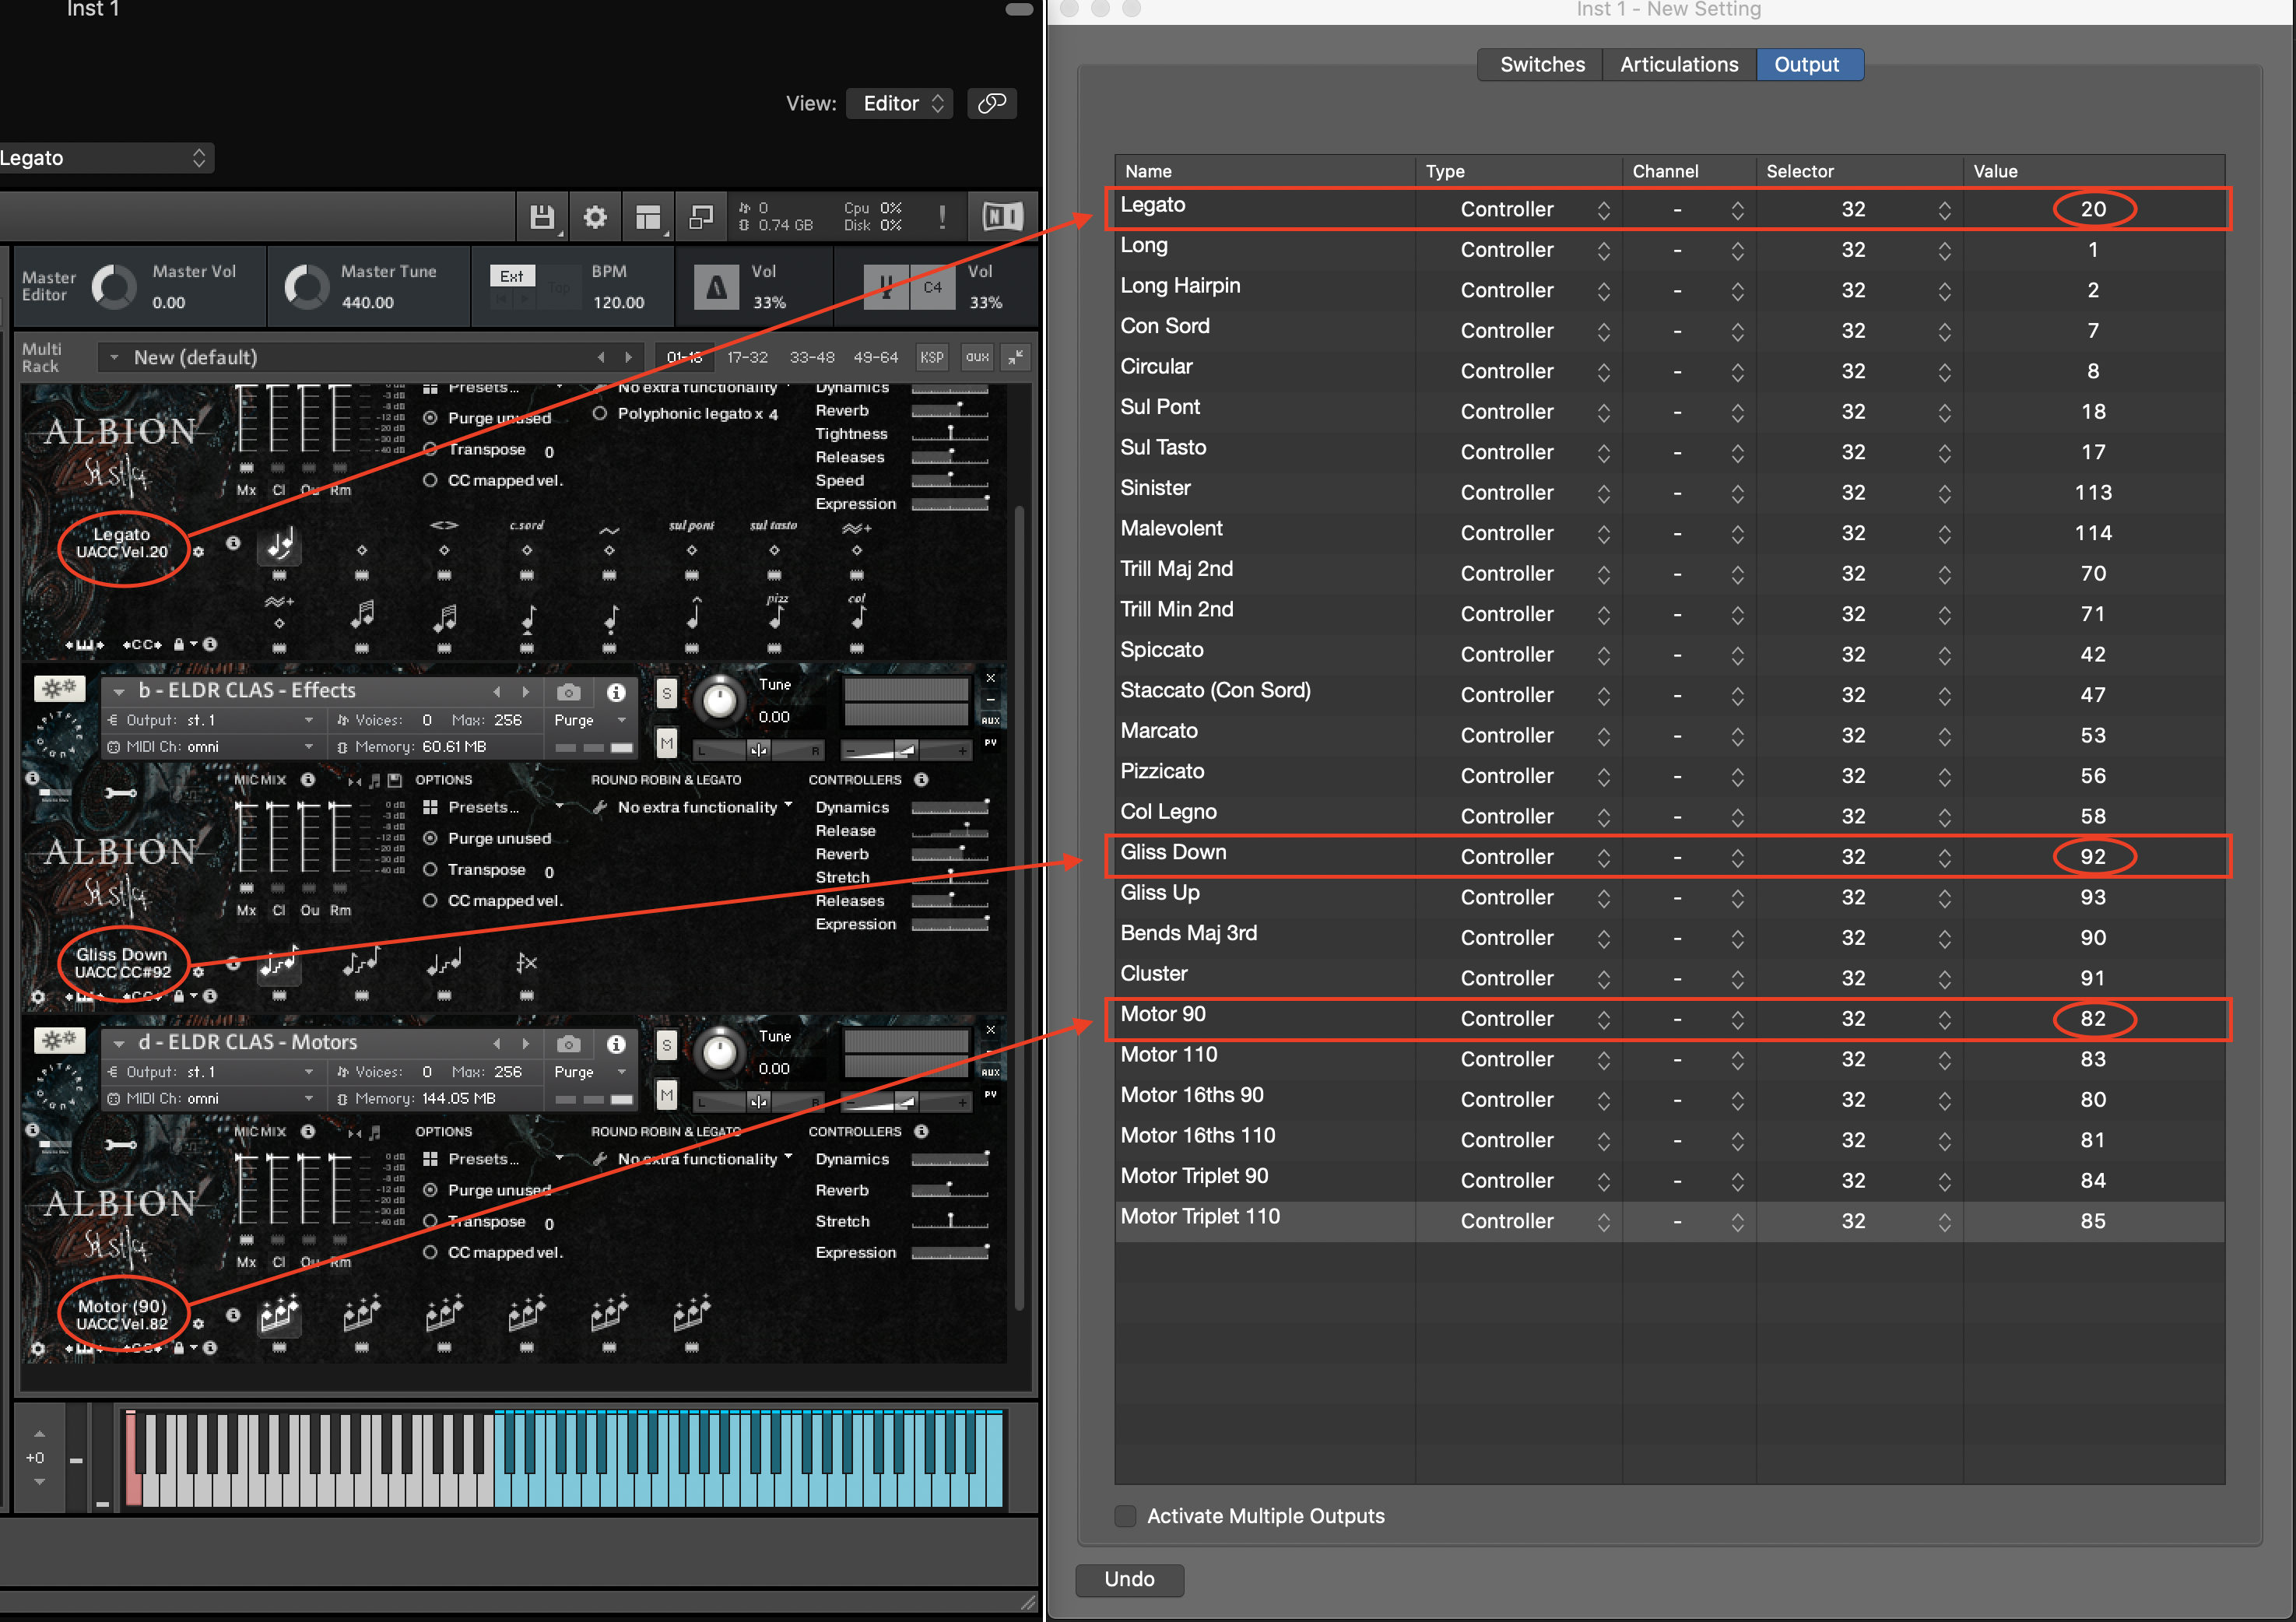
Once set up you now can Keyswitch using the menu in the Piano Roll as above.

With UACC, when a Keyswitch is not selected it will show as "None" selected in the instance- which is helpful when using Kontakt libraries where you are only trying to achieve one output at a time from the multiple instances of the library (as shown below and in the tutorial above).
Part 3 - Saving and Sharing Your Articulation Sets
When you have completed your Articulation Set, you should click on the Articulation Set drop down menu and select Save As...
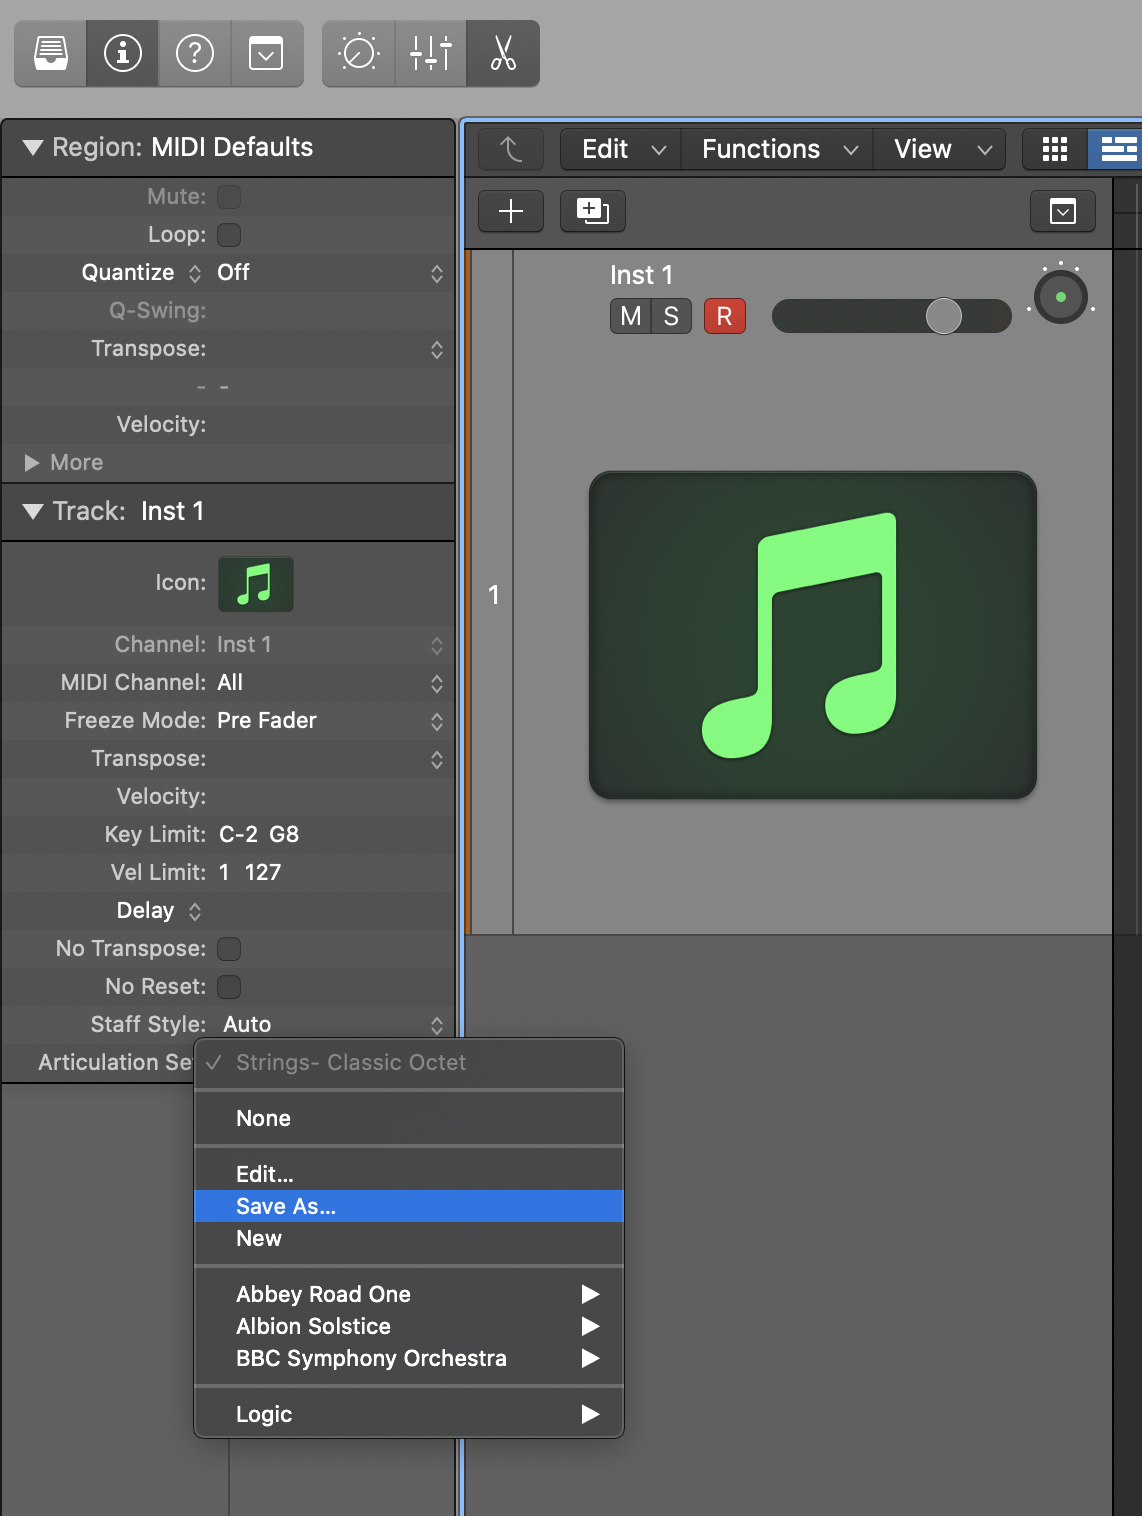
This will lead you to the save menu, where you will now be able to save the file in your user location (User/Music/Audio Music Apps/Articulation Settings). It is recommended to create a new folder for each library to keep everything organised.
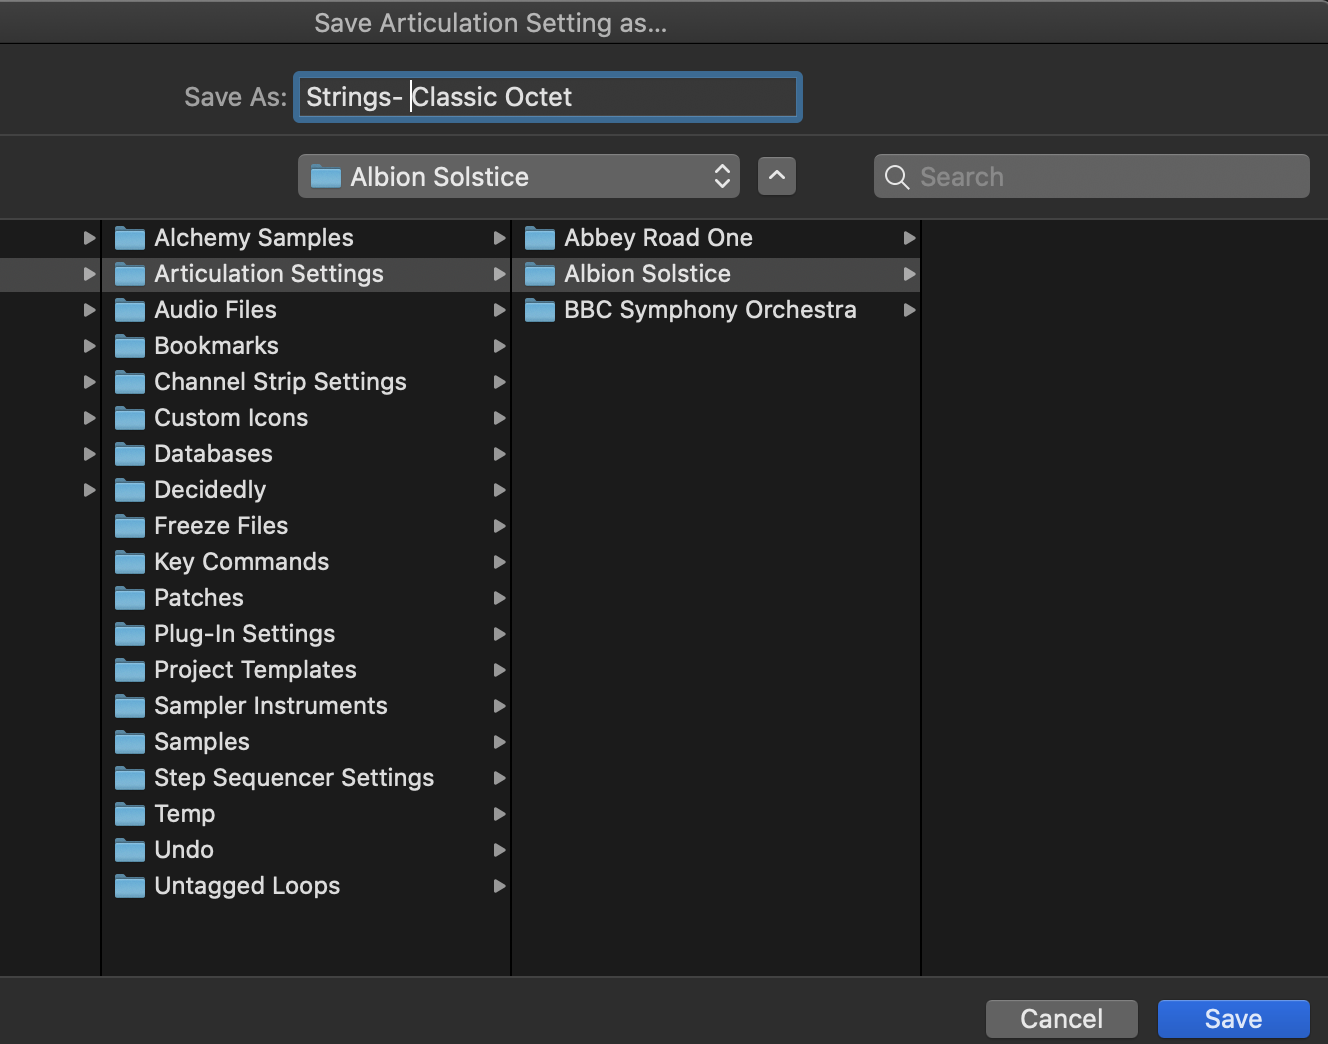
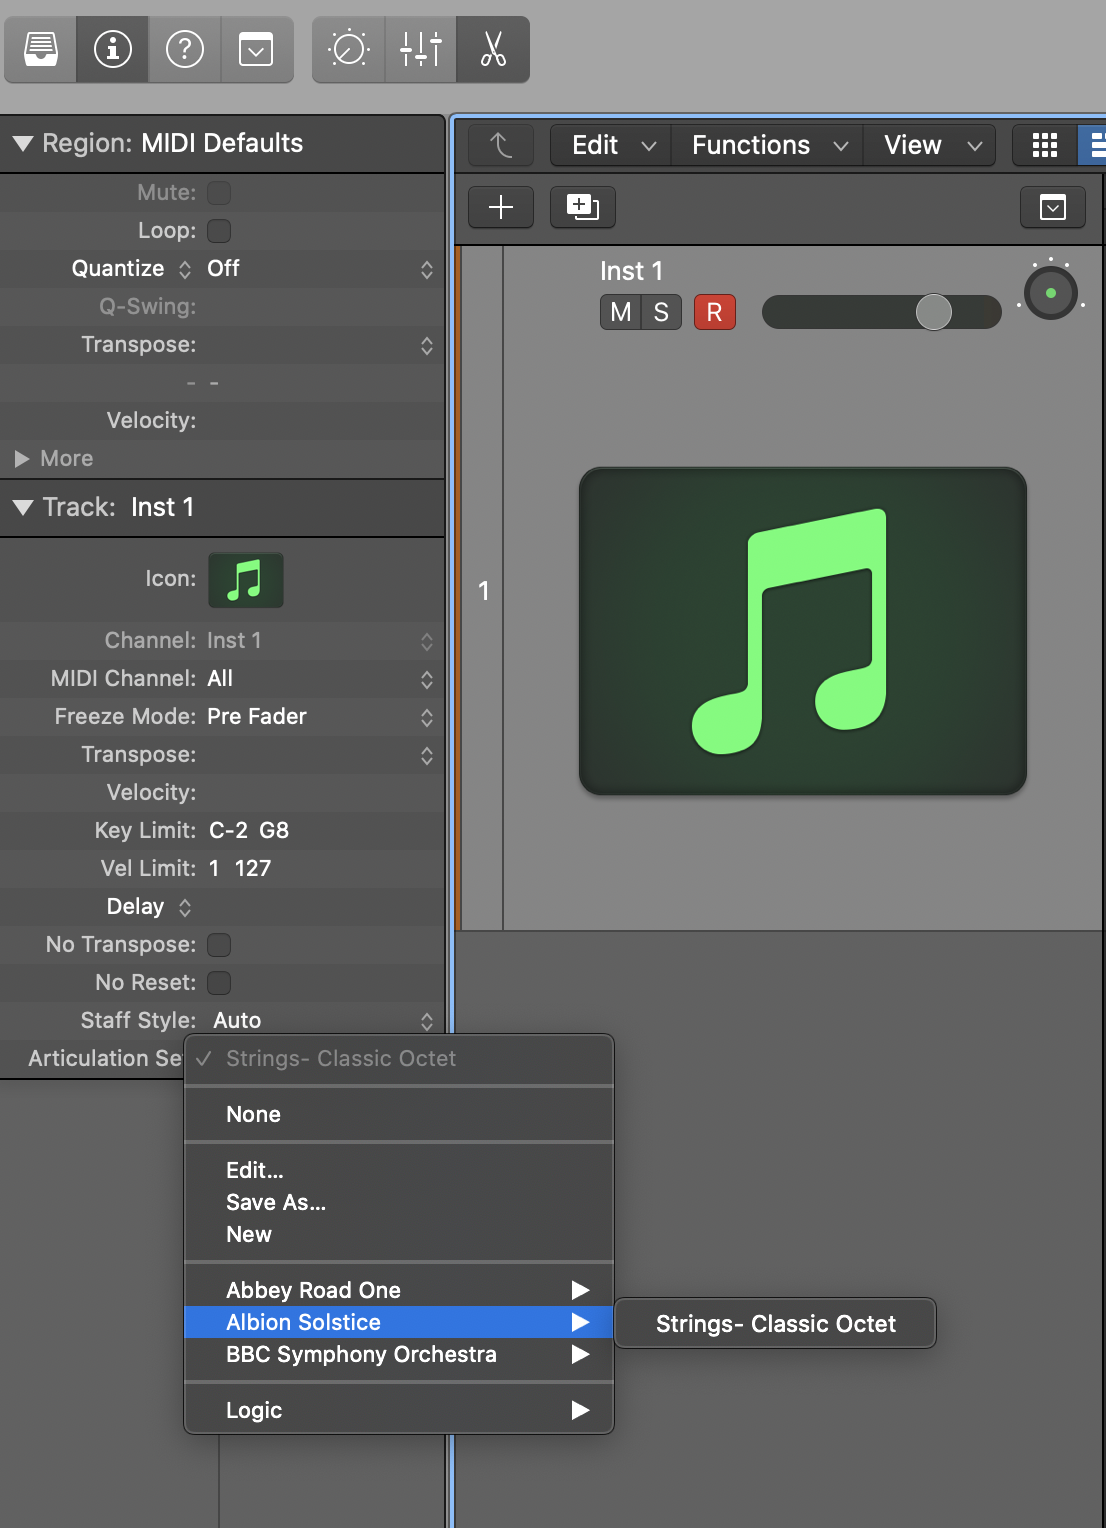
Once saved, you should then be able to recall the Articulation Set back in any Logic Session by using the Articulation Set menu. You can share your articulation sets with anyone, by sending them the .plist file in the Articulation Settings folder. All they need to do is place this in their own Articulation Settings folder on their Macintosh device.
If you need any further support creating Keyswitching with our libraries, please reach out to us using the Help Widget below.